TcMenu supports a wide range of displays, input devices, and remote control options. To support such a range of hardware, a plugin system is required. Once you're menu is edited and ready, select Generate Code from the page header to open the generator page. We'll discuss the page below.
Each part of this page is discussed in detail below.
Configuring the board level options
The top part of the code generator allows you to configure the board-level properties. We'll go through each of the options below.
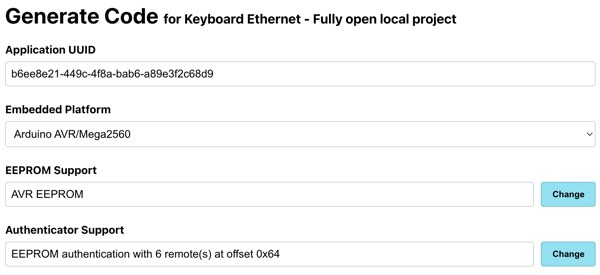
- Application UUID the unique ID of the application. Each application has a unique ID, it is used to identify the application, with this each board can have as many serial numbers as required.
- Embedded Platform the platform that the code will be generated for. This is used to select the correct mode of code generation.
- EEPROM Support menu applications can load and save items to EEPROM. Many types of EEPROM are support by the library, select the right EEPROM for your hardware.
- Authenticator Support when using TcMenu authentication with remote control, this option checks that a particular client is allowed to connect to the menu. Each client has a UUID and a name, this is used to identify the client and ensure that only authorized clients can connect to the menu. Read about this in the full menu documentation
In most cases, you can search the plugins by just entering the display/input type that you have, then it is as simple as entering the right configuration properties and clicking the "Generate" button.
Selecting and configuring plugins
Below the board level properties are the plugins for input, display, and remote. You can choose a plugin seimply by clicking on either the current image, where it has the button Change underneath. Below is an example:
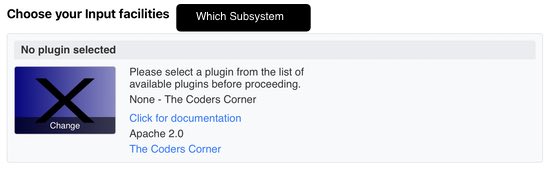
Once you click on the choose button, a list of plugins appears. You can select a plugin from the list that's provided. The list will contain plugins that are compatible with the selected platform and subsystem. There is also a search box that allows you to filter the list. See below:
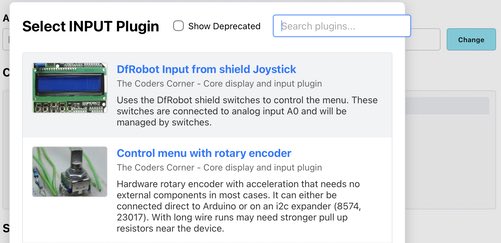
Once you've selected a plugin, the configuration details for it will appear on the right side, and you can configure it as required. Each plugin comes with documentation that describes how to configure it. It is in the Click for documentation link.
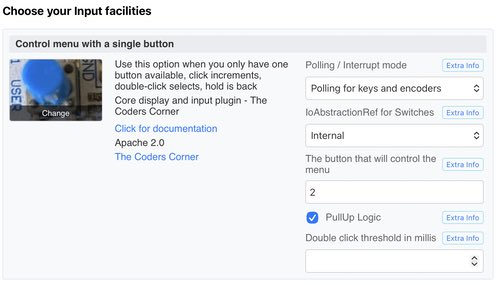
On the left is a thumbnail of the plugin, in the middle is the description and a link to documentation, and to the right are the properties.
Each of the properties on the right-hand side of the plugin window is used to populate variables during generation. The properties are saved in the project EMF file and will be remembered. Most plugin properties have an additional longer description accessed using the Extra info button.
Although it is possible to wrongly configure a plugin, some basic validation of the value is done. Below is how each type of property is validated:
- For pins, the pin must either be a positive number such as a valid pin number E.G.
10, no pin-1, or a variable name, such asA0for example. - For numbers, unsigned integer numbers within a specific range. Each property defines that range.
- For text, safe strings that are unlikely to cause issues in generated code.
- For variables, a valid
C++variable name. - For menu items, a drop down of compatible items will be provided.
- Where there are clear choices, a drop-down with all of them will be provided.
- For flags/boolean, a checkbox will be provided.
Running code generation
To run code generation for your platform, click the "Generate" button. This will switch to display a log viewer showing the progress of the code generation on the server.
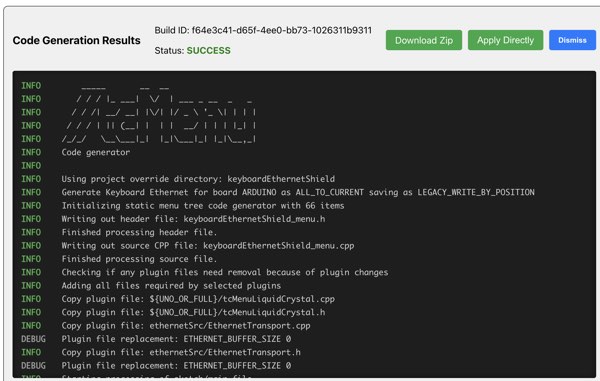
The status of the generator system is shown at the top of the log viewer, along with the build ID. Once the build has completed, the status will update and a few new buttons appear:
- "Download Zip", will get the files generated from the server. The output of this will be a project loadable into the Arduino IDE.
- "Apply Directly" (round trip mode) updates the files locally after generation has completed. The status will change to
PATCHED FILESwhen local patching is complete. - "Dismiss" closes the log viewer.
Additional documentation
You can see a more detailed guide to code generation where the files and other components are discussed.
Once you've generated the code
Depending on the mode used, the code generator will either prepare a zip file for the application or it will offer to patch files locally in round-trip mode. In most cases, the application should run without adjustment on your hardware. Leaving you just to build the project and upload the code to your Arduino board.
The output code for Arduino boards is compatible with Arduino IDE (and we often test that it is) along with a wide range of build systems, editors, and IDEs. I tend to use the CLion IDE with PlatformIO plugin for Arduino and mbed, and CMake for PicoSDK and ESP-IDF. Many also use PlatformIO with VSCode, or even the Arduino plugin with VSCode.
At this point you'll probably want to use the main tcMenu documentation as needed to move forward building out your project.
These may be of interest
- Similar - Embed Control developer version for controlling and monitoring Arduino
- Similar - Control embedded menu application from browser - embedCONTROL.js
- Similar - Using menu designer as an embedded initializer
- Similar - Designing menu layouts using web designer
- Similar - Using menu designer to fully manage your menu structure

Want to let us know about something?
- If this is a library documentation page, raise a PR on the documentation site.
- Open a discussion on the Community channels
- Contact us for problems or improvements on the main site.
Table of contents
Supporting us
We maintain several popular embedded projects and work hard to make them even better. If you're looking for commercial services, please do consider us.
Alternatively, you can buy us a coffee to say thanks.
Sharing links
Learn about TcMenu
We build and maintain an embedded menu designer and framework that works on many platforms.