In this guide we cover code generation in more detail. Once a menu structure has been built it needs to be turned into code. To do this we use the code generator (menu: "Code -> Generate code"). Once selected a dialog similar to the one below will be presented.
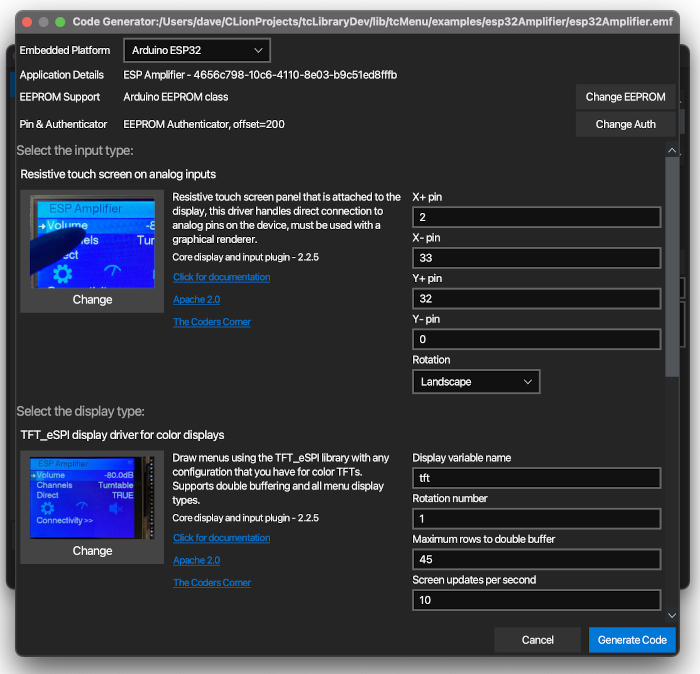
At this point we need to define the devices that we plan to use, in terms of Board, EEPROM, Authentication, input, display, and any remote connectivity. Before moving on to discuss plugins and actual code generation, we'll go through the options at the top of the code generator.
- Embedded platform: this defines the platform that we are generating for, and should be set before any other options are chosen, as this affects what EEPROM and plugin options can be chosen.
- Application details: this is read only and just shows the application details as they were set in the root panel during menu editing. If these are wrong, go back to the main designer window and select the root item where you can edit them.
- EEPROM support: configure the type of EEPROM to be used - see EEPROM configuration documentation.
- Pin & Authentication: configure the type of authenticator to use for storing pins and authentication for remote control - see Authenticator documentation
How plugins work
In order to simplify both your code and the designer, inputs, displays, themes and IoT solutions are added using plugins. Plugins are actually defined using a mix of XML and C++ source that's included in the project. Each plugin indicates which boards it can work with, so if a plugin is shown in the selection list, it's likely to work with your hardware.
There are four main plugin groups, Input, Display, Theme, and Remote. While you can only have one Input, Display and Theme plugin, it's possible to have more than one remote/IoT plugin. Below we see an example of a plugin within Code Generator.
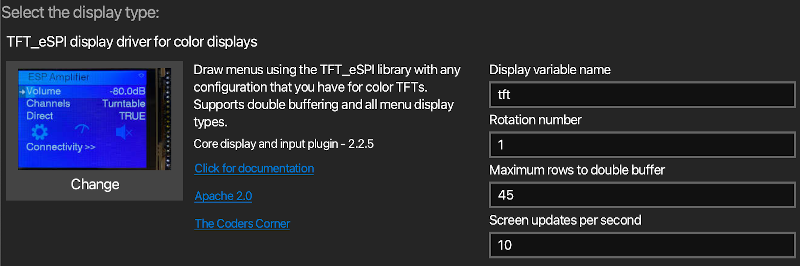
On the left side we see the description of the plugin and an image representation in a button, clicking on the image button allows you to change to another plugin. We can also see the description, license and documentation link next to the button. Clicking on the online documentation will open information about the plugin in your browser.
Plugin properties
Over to the right, you'll see a series of properties that can be edited. These are the adjustable parameters for the plugin, usually things like pin settings, libraries, dimensions etc. Usually the plugin documentation will describe these in detail. There are several types of parameter, each is described here:
- Header file names and variables, these must follow the usual rules for variable names.
- Integer fields, usually bound by a min and max value.
- Boolean fields are normally shown as a check box.
- Choices in the form of a combo box where one must be selected.
- Pin fields that can either be -1, a positive value, or a variable name
- Font definition, see theme documentation on fonts.
- IO device is a reference to an IoAbstractionRef or devicePins / blank for none, see the IO device documentation
Specific types of plugin
- Input - the input plugin offers choices for input to the menu, rotary encoder, touch screen, joystick to name a few.
- Display - the display plugin bridges the gap between the menu structure and the display driver.
- Theme - for graphical displays, most need a theme that provides the colors, fonts and spacing.
- IoT/Remote - you can also add various types of remote IoT control to your menu, tcMenu is written with this in mind.
Special cases for IoT/Remote plugins
Unlike other plugins, there can be more than one IoT remote plugin. To the right of the IoT plugin area there is a button labelled "Add another IoT Remote"; which when pressed will add an extra IoT plugin to the project. Apart from the first remote plugin which can't be removed, all other IoT plugins can be removed by pressing the "X" button next to that plugin. If you don't want any IoT functions, set the first plugin to "No remote capabilities".
Code Generator
Once the "Generate Code" button is pressed, a logging window is displayed that udpates as the code generator runs, once complete the "Close" button will be enabled on this dialog. You can take a copy of the contents of the window using the "Copy to Clipboard" button. In the event that the generator didn't do what you expected, you could try pressing "Include Debug" to get extra log information. This window is presented below:

How the code is generated
Code generation starts by turning the menu items into a series of linked lists, one for each submenu. This is fully documented in the menu item docs where the code generated for each specific type is also discussed.
Along with menu structures, a ConnectorLocalInfo is created that contains the unique ID (in the form of a UUID) and name of this embedded application. At this point the EEPROM and Authentication are also generated, the next step is to work out what variables, header file includes and setup functions are needed for each plugin. Note that you can also set the board serial number using compiler flags, or even override how it is generated completely for larger scale situations, consult the build time flags settings.
The way this works is that each plugin, Display, then Input, then IoT and lastly theme is asked to generate the includes, variables, and setup functions needed. Menu structures and plugin setup is written into files with the name of the project followed by _menu.cpp/_menu.h. These two files are overwritten every time code generator runs, so it's best not to edit them.
In addition, some plugins also contain source files, these source files are packaged with the plugin and included into the project during code generation. Unless the file explicitly says you can edit it, you should not locally edit that file, as it will get overwritten during code generation. Exceptions: Theme files are generally not overwritten, if you want to regenerate the theme header file, you'd need to delete the existing one.
Lastly, the INO/main file is checked to ensure that all functions that need to be implemented are present in the sketch. If they are not then code generator will add them. If a list or custom choice item has no rendering function defined there, it will be added.
Example project directory annotated:
 AmplifierController.h      user created file not touched by code generator
 TestingDialogController.h  user created file not touched by code generator
 additonalCallbacks.cpp     user created file not touched by code generator
 app_icondata.h             user created file not touched by code generator
 EthernetTransport.cpp      file generated by plugin, should be left alone
 EthernetTransport.h        file generated by plugin, should be left alone
 tcMenuTfteSpi.cpp          file generated by plugin, should be left alone
 tcMenuTfteSpi.h            file generated by plugin, should be left alone
 ThemeCoolBlueModern.h      theme file, special case, can be edited by user
 esp32Amplifier.emf         EMF file containing the menu definition
 esp32Amplifier_main.cpp    The menu structures and setup code.
 esp32Amplifier_menu.h      The menu structures and setup code.
 esp32Amplifier_menu.cpp    The main sketch file, may be INO as well
The make-up of a typical menu application
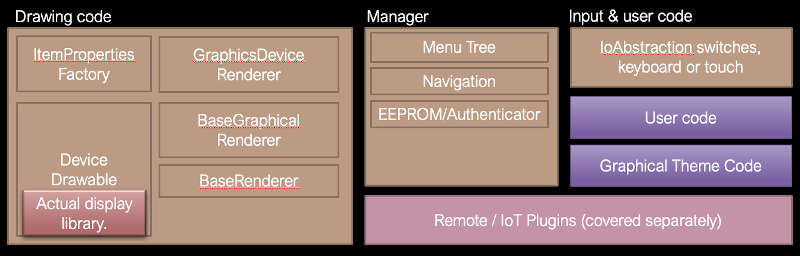
In the diagram above, we can see a block diagram view of how an application is formed. On the left is the drawing code, depending on the type of display you use part or all of this structure will be in place. In the middle is the menu manager or menuMgr on device. Then over on the right you see the input, user level code, and the remote plugins.
User code and graphical theme code are considered part of your project for you to edit, the rest are mainly generated for you during the code generation run. You can read more about the drawing code structure to better understand it.
For any application to work, you need tcMenu, IoAbstraction and TaskManagerIO at a minimum. Depending on the plugins you have chosen, you may need to install additional libraries too. It's best to keep these libraries up-to-date quite frequently. In nearly all cases, they are backward compatible.
How round tripping works
You can create your menu project iteratively, going between the designer and your IDE. This is because the Code Generator follows some simple rules.
- Changes to the INO / main project file are non-destructive. We add new callbacks for you but never remove anything. Code generator also takes a backup before making changes.
- You can add any additional source or libraries to your project, they will not be affected.
- The main menu structures and plugin variables and setup code are placed in the projectName_menu.cpp/h files, these are overwritten every time around and should not be updated.
- The plugin source files added to you project again should not be edited, they are replaced each time around.
Quick Start display plugins vs manual
For Adafruit and U8G2 there are two types of graphics plugins, quick start and manual (or custom). With quick start plugins, we take all the parameters up front and create all variables needed on your behalf. These are the easiest to get started with if you’re using a compatible display.
For the displays we don’t support with quick start you need to create the graphics variable yourself in the sketch / project file, and then provide that variable in the variable name parameter in code generator. You will also need to provide the variable type name for the graphics library. That is usually the same name as the header file without the .h extension.
When using manual mode you must have initialized the library BEFORE calling setupMenu().
When there isn't a plugin for the item you need
There will inevitably always be libraries that we do not support, we’ve made the process much easier for writing your own plugin, in most cases very little code will be needed. You could even contribute it back or make your own plugin that others can use!
The Plugin format
The plugs are not written in Java and they do not need an understanding of Java to work on them. They are purely made up of easily editable XML and C++ source files. They are fully documented in the Menu designer repo under xmlPlugins and we gladly accept PRs that don't break existing functionality!
These may be of interest
- Similar - Write XML with GroovyBuilder
- Similar - Wrapping JFreeChart as a Groovy builder
- Similar - Reading XML in groovy using XmlParser
- Similar - Generate an ATOM feed with GroovyBuilder
- Similar - Groovychart Bar chart with fixed colour

Want to let us know about something?
- If this is a library documentation page, raise a PR on the documentation site.
- Open a discussion on the Community channels
- Contact us for problems or improvements on the main site.
Table of contents
Supporting us
We maintain several popular embedded projects and work hard to make them even better. If you're looking for commercial services, please do consider us.
Alternatively, you can buy us a coffee to say thanks.
Sharing links
Learn about TcMenu
We build and maintain an embedded menu designer and framework that works on many platforms.
