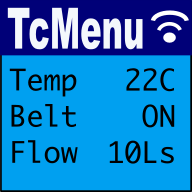
TcMenu Designer Turbo allows you to rapidly generate a menu UI application for Arduino/PicoSDK from your browser, including setting up the display and IoT control. Designed from the ground up for non-trivial embedded menu-based UIs, it can shorten your project significantly. It is built using our web-based visual designer and trusted code generator that's been building menus for nearly 10 years.
Who TcMenu Turbo is for
TcMenu Turbo is a strong fit if you want to:
- Build structured menu-driven UIs for Arduino, PicoSDK, or similar embedded targets
- Configure displays, inputs, and plugins without wiring everything up by hand
- Generate code quickly, while keeping it readable enough to maintain in your IDE
- Add remote or IoT control without building a separate UI stack from scratch
TcMenu Turbo is designed for structured embedded menu applications. For smaller projects, a simpler hand-coded library may be enough, while a GUI framework may be a better fit for full graphical or touch-first interfaces.
Comparison with other menu frameworks
Each of these libraries brings something valuable to the embedded UI world, and "TcMenu Turbo" is designed to sit alongside them rather than compete with them. "TcMenu Turbo" fills a gap between a trivial menu and a full UI: I.E. it provides a modern workflow for structured menus, IoT integration, and rapid iteration through its fluent builder and web‑based designer.
| Feature / Library | TcMenu Turbo >> | Arduino Menu Libraries | LVGL | GEM |
|---|---|---|---|---|
| Design Philosophy | Structured menus with modern tooling and code generation | Lightweight, simple, very Arduino‑friendly | Full GUI framework for rich, touch‑driven UIs | Minimalistic graphic menus for small displays |
| Designer UI | Web‑based designer with live updates | Typically hand‑coded | Hand‑coded layouts | Hand‑coded layouts |
| Code Generation | Automatic, template‑driven, non‑destructive | Manual coding | Manual coding | Manual coding |
| Hardware Support | Broad: LCD, OLED, TFT, U8g2, TFT_eSPI, JavaFX, and more | Varies by library | Extremely broad (touchscreens, GPUs, full GUI systems) | U8g2 + SparkFun Serial Backpack |
| Input Methods | Encoder, buttons, touch, keyboard, remote IoT | Buttons/encoders | Touch‑first | Buttons |
| IoT / Remote Control | Built‑in remote UI + Java API | Rare | Possible but manual | No |
| Complexity | Medium (guided by designer) | Low (great for beginners) | High (full GUI system) | Low |
| Best For | Embedded menus, IoT devices, structured UIs | Simple Arduino projects | Rich GUIs, dashboards, touchscreens | Minimalistic graphic menus |
| Community Strength | Strong docs, examples, and videos | Very approachable for newcomers | Large ecosystem and active development | Clear documentation and focused scope |
Example code taken from real projects
The below shows just how far we've moved the dial on code readability. You can see the menu structure is very human-readable, and if it is human-readable, then not only is it easy to read and maintain, but AI can also understand it. Spend less time in designer and more time in your IDE:
void buildMenu(TcMenuBuilder& builder) {
    builder.usingDynamicEEPROMStorage()
        .actionItem(HIBERNATE_ID, "Hibernate", NoMenuFlags, onHibernate)
        .analogBuilder(INT_EDIT_ID, "Int Edit", ROM_SAVE, NoMenuFlags, 4)
            .offset(0).divisor(1).maxValue(100).unit("%").endItem()
        .subMenu(EXTRAS_ID, "Extras", NoMenuFlags)
            .textItem(EXTRAS_TEXT_ID, "Text", ROM_SAVE, 10, NoMenuFlags)
            .rgb32Item(EXTRAS_RGB_ID, "Color", ROM_SAVE, false, NoMenuFlags)
            .endSub();
}
Not only that, the themes are also very readable; once you've picked a starting theme, you can easily tweak it to your liking without a trip back into the designer. Even overriding individual items to draw in a grid layout is easy:
// we want to layout two items using XBitmap images on the same row, so what we do is to
// use the onRowCol method to specify the row and column
void applyLayout() {
   int requiredRow = 3; // we want the third row to have two items split horizontally
   int numberOfColumns = 2; // We'll split the row into two columns
   TcThemeBuilder themeBuilder(renderer);
   themeBuilder.menuItemOverride(menuDirect)
            .onRowCol(requiredRow, 1, numberOfColumns)
            .withImageXbmp(Coord(20, 20), directBitmapOff, directBitmapOn)
            .apply();
}
As a bonus TaskManagerIO is built in too, there's an inbuilt scheduler that can also handle complex events. Example to schedule a task:
void setup() {
    // .. other code
    taskManager.schedule(repeatMillis(500), []() {
        // do some work here every 500ms, don't do anything that blocks for too long.
    });
    // .. other code
}
And lastly, if you want to use it, all display plugins we've written support TcUnicode, allowing you to use UTF-8 encoded strings in your menu with ease. While still maintaining 100% compatibility with existing graphics libraries.
How it works
TcMenu Designer Turbo is a web application that runs in your browser. Just four steps to get started:
1. Open Turbo web-app and create/open a project
Firstly visit our Arduino menu builder web app to get started. You can either create a new project or open an existing one. To create a menu from scratch select Start Project or to load an existing embedded menu file *.emf file go to Edit Menu.
Not only has fluent builder mode been added, but you can also now request that designer puts all plugin code in the project menu.cpp/menu.h files minimizing noise.
2. Design your menu visually
Create your menu visually using the web editor interface. You can add menu items, sub-menus, and configure their properties. Any items you add will be inserted in the currently selected sub-menu. Just as with desktop designer, copy and paste works too.
Unlike in the past, once you've got the menu design ready, you have no need to round trip, if you choose fluent builder mode, the menu structure is very human and AI readable. You can add menu items yourself without needing to round trip.
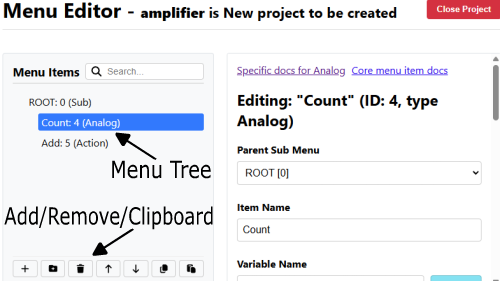
Below shows the menu editor, showing how it is broken into a tree, the buttons to add/remove/copy items, and the properties for each item.
3. Configure the plugins you need
Once you've got the menu design ready, you can configure the plugins you need for your project. TcMenu supports a wide range of plugins for different devices and features. Select the display and input plugins you need and configure them by setting the properties.
It is as simple as selecting the nearest plugin to your hardware and configuring it.
4. Generate the code and start building
Lastly, to generate the code for your platform of choice simply click the "Generate" button. The code generator will prepare a zip file with the embedded application, and that application should run without adjustment on your hardware. Leaving you just to build the project and upload the code to your Arduino board.
Do check the generator log that's returned, and note any errors or warnings that may have occurred.
Notes around building your project in an IDE
You can use any IDE that supports Arduino, ESP-IDF or PicoSDK depending on the build options you choose. We personally use CLion with PlatformIO integration by Jetbrains, but there are many other options including PlatformIO in VSCode and Arduino IDE.
For Arduino and PlatformIO: tcMenu library is directly supported within their library repositories, no need to manually download. More Information about libraries
For PicoSDK and ESP-IDF: See our tcLibraryDev project on GitHub for more details. It has the required CMake files.
Desktop users only
For nearly all users, we recommend using TcMenu Turbo as it runs in a browser and needs no installation. Not only does it run in a browser, it uses the same generator behind the scenes as the desktop version, can load your existing EMF files, and if desired, can even convert them to use the new fluent builder API.
You can still download the legacy version of TcMenu Designer, but we strongly recommend TcMenu Turbo for all users. If there's any reason you can't use TcMenu Turbo, let us know in the tcMenu GitHub discussions.
More documentation
Getting started with tcMenu Turbo
Summary TcMenu Turbo is a new version of tcMenu that is designed to be more efficient and easier to use. At the core of this improvement is Menu Designer Turbo, a new web based application that allows you to create menus in a simple and intuitive way. With Turbo, we recommend that you move your menu project to generate plugin code...
These may be of interest
- Similar - Write XML with GroovyBuilder
- Similar - Wrapping JFreeChart as a Groovy builder
- Similar - Reading XML in groovy using XmlParser
- Similar - Generate an ATOM feed with GroovyBuilder
- Similar - Groovychart Bar chart with fixed colour

Supporting us
We maintain several popular embedded projects and work hard to make them even better. If you're looking for commercial services, please do consider us.
Alternatively, you can buy us a coffee to say thanks.
Sharing links
Learn about TcMenu
We build and maintain an embedded menu designer and framework that works on many platforms.