How the Arduino memory model works - for AVR
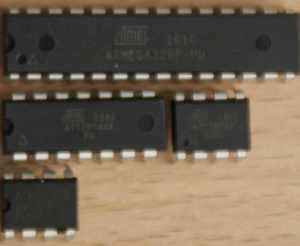
An overview of memory organisation All general purpose processors, be it Intel, ARM or AVR devices work by reading instructions from memory and executing them. They are generally based on one of two Architectures: Von-Neumann or Harvard. The vast majority of larger systems such as PC's and mobile devices use Von-Neumann, but AVR processors in Arduino boards such as Uno and...

Unit testing embedded and Arduino projects
When you've got more than the simplest embedded program for Arduino (or any other framework), it becomes much harder to test that it's working properly by purely running it. For something like Blink, testing is simple because all we need to do is upload it and see the LED turn on and off; there's little risk of missing anything significant. However,...
Evaluating static memory (SRAM) usage in an Arduino Sketch - Part 1
While writing IoAbstraction and TcMenu, I noticed that SRAM memory usage seemed to increase at a rate greater than what seemed right by static evaluation of all the objects I had created. This will become a series of articles on the subject of efficiency in microcontroller environments. In this part, we'll look at how to evaluate memory on your device, and...
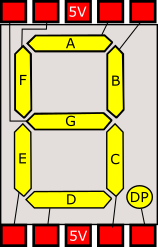
Checking if 7segment display is common anode or cathode
If you've got a 7 segment display but are not sure if it is common anode or common cathode, then you need to check the polarity of the display. This is easily done with a low voltage supply (9V or less) from a battery, bench PSU or Arduino board. Firstly and before anything else, connect a 1K resistor between the common...
Stabilising an existing Arduino or embedded product
Sometimes the situation arises where a product is built (or gets close to being built), before any concerns about it's stability are discussed or proper planning arranged. Often this leads to code being written without any proper test plan in place. Combined with very tight deadlines there's often even no plan to go back and fix things up. Once this situation...
Arduino Sketch compilation, cost of virtual tables, Wire memory use - part 2
In part 2 of this series we discuss how sketches compile on Arduino, along with the cost of using the virtual keyword to create virtual classes. Some things are not quite as clear cut as may be initially thought, especially in the very low memory environment of the ATMega328 (Arduino Uno). Lastly we discuss the memory usage of Wire and how...
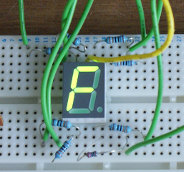
Arduino single 7 segment analog measurement example
Measuring voltage from an analog input. Following on from the previous example ( example for driving 7 segment LED displays ). we now build on the same circuit to make a simple voltage meter. Additional requirements: Potentiometer of at least 10Kohms . In order to measure voltage, we need to use an Arduino board analog input. Usually these are marked...

Getting started Unit testing with Arduino platform
This article discusses how to unit test a simple project with Arduino, if you're not used to writing unit tests, or need more background, then first read this guide on unit testing embedded projects . Presently, all our testing uses PlatformIO's inbuilt testing framework. It works pretty well overall, we wrote this because we needed the testing to work on...

Arduino multiple digit, 7 segment display tutorial
On the previous page covering single digit displays , we dealt with driving one 7-segment digit. On this page we'll use a multi-digit display and assume 4 digits. Just like single devices, multi-digit 7-segment displays have connections for A-G, DP and common, but they have a common pin for each digit, with one set of A-G and DP pins that are shared....

Wiring a 20x4 character display to an Arduino board
In this article I describe how to wire a 20x4 character display to an Arduino. I'm assuming you are using a regular 5V 8bit Arduino, if this is not the case this article will not work for you as you'll need voltage level converters. Most character based LCD displays use the same wiring, but I can't guarantee that all will be the...
These may be of interest
- Similar - Write XML with GroovyBuilder
- Similar - Wrapping JFreeChart as a Groovy builder
- Similar - Reading XML in groovy using XmlParser
- Similar - Generate an ATOM feed with GroovyBuilder
- Similar - Groovychart Bar chart with fixed colour

Supporting us
We maintain several popular embedded projects and work hard to make them even better. If you're looking for commercial services, please do consider us.
Alternatively, you can buy us a coffee to say thanks.
Sharing links
Learn about TcMenu
We build and maintain an embedded menu designer and framework that works on many platforms.
