Summary
Our web-based menu designer (TcMenu Turbo) creates and maintains your embedded menu project online. This guide assumes initializer mode. In initializer mode you set up the basic menu structure, choose and configure plugins for your hardware, then run code generator. Using initializer, all plugin code and wiring will be generated into the <project>_menu.cpp and <project>_menu.h files. You menu structure code will be generated into your sketch file where you can edit it. This means only coming back to designer if your hardware or board changes.
However, should you prefer round trip mode where you visually design your menu and edit it in designer, it is also fully supported.
Getting started
Visit TcMenu Designer Turbo to get started with the web based UI.
Getting started with a new project
Simply click the "Start Project" link on the top header, and the following dialog will appear:
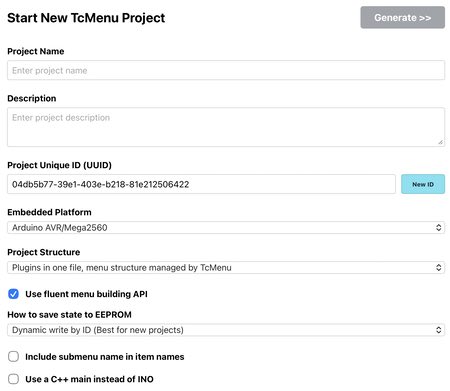
Description of each field:
- Project Name - this is the name of the project, the directory for the project will be this with only alphanumeric characters and underscores.
- Project Description - this is a short description of the project,
- Project UUID - All TcMenu projects have a unique UUID, this allows for easy identification when using remote services.
- Embedded Platform - Choose the platform closest to what you are using (see build options below).
- Project Structure - Choose "Plugins in one file, menu in sketch" option.
- Use Fluent Builder - Ensure it is on, to use the Fluent Builder format in your sketch.
- How to save to EEPROM - With fluent builder we recommend dynamic EEPROM support is enabled.
- Include submenu names in item names - this recursively names your item, for example menuSettingsItem1.
- Use a C++ main class - if you're using platformio or similar powerful IDE, you may prefer a C++ main file.
Once the above are configured as you require, simple click the "Generate" button.
Getting started with an existing project
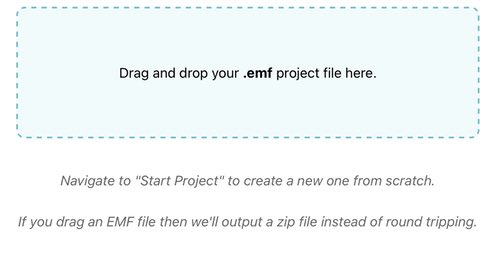
Any project, even an existing one can be reformulated into an initializer project. Simply drag the project into designer, select the root element in the menu tree, and adjust the settings as laid out above. Because the project was dragged in, it will output a zip file. Again if you prefer to round trip that is fully supported too.
If you already have an EMF file that you want to run through the new designer again, go to the Menu Edit tab on the top header, and drag the EMF file into the box shown below to load it. See the image below:
Editing a loaded project
Once you've loaded a project, add/remove items, navigate menu items and even add additional IO expanders to the project, ready for code generation. Below is a screenshot of the menu editor:
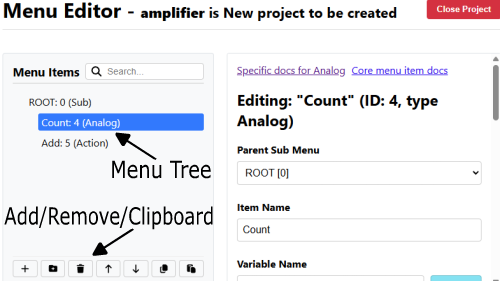
From here you select items in the menu tree, each item that you select shows up in the editor on the right side, where you can change the settings for it. There's a documentation page for each item type, and that's linked at the top of the page.
You can add items to the menu by clicking the "+" button at the bottom of the tree, you can also add a template from there now too (a template is a whole menu structure instead of a single item). You can also move items around and copy/paste them too from the same toolbar.
Adding IO expanders
You can add and manage IO expanders in the project from the IO expanders tab. An IO expander is a device that handles additional GPIO's that are often on I2C. Any IO expanders you add in this tab will be available during code generation.
Documentation around adding and using Io Expanders
Code Generation
Once you've finished editing your menu, you can generate it by selecting "Generate Code" from the header menu.
The generated code is based on the selected platform, and you can at this point choose the input, display and remote technologies that you want to use. Each subsystem such as input, has a plugin configuration that allows you to select the plugin to use, and to configure it as well.
To select a plugin, click the "Change" button for the appropriate subsystem. See below:
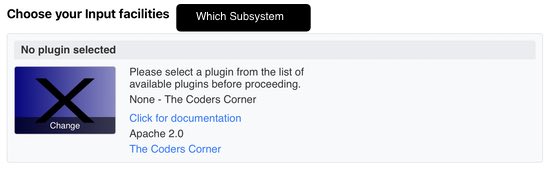
You can select a plugin from the list that's provided. The list will contain plugins that are compatible with the selected platform and subsystem. There is also a search box that allows you to filter the list. See below:
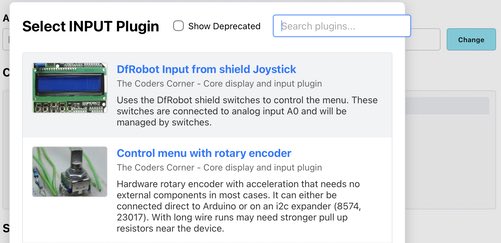
Once you've selected a plugin, the configuration details for it will appear on the right side, and you can configure it as required. Each plugin comes with documentation that describes how to configure it.
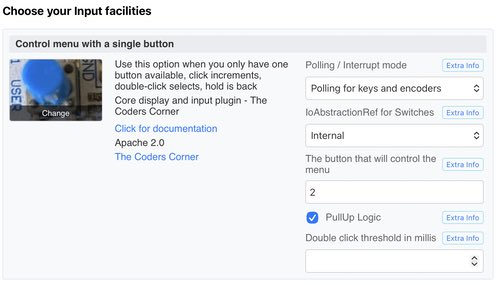
Once you've configured all the plugins, you can select an EEPROM if you need to save the menu to EEPROM, or have used any other EEPROM features. This is done at the top of the page in the EEPROM section.
Now press the "Generate" button to generate the code. A zip file will be downloaded to your browser and you'll see the logs in the code generation window.
Going further
You can now expand the zip and move over to your IDE. You can use this project in Arduino IDE. Although, we tend to use CLion with PlatformIO, but any IDE that supports C++ and PlatformIO should work. As long as all the plugins and pins were correctly defined, the project should compile and run.
For Arduino and PlatformIO: tcMenu library is directly supported within their library repositories, no need to manually download. More Information about libraries
For PicoSDK and ESP-IDF: See our tcLibraryDev project on GitHub for more details. It has the required CMake files.
Deeper documentation links:
- GitHub Discussions: Ask questions and share your projects
- TcMenu Docs: Full TcMenu library and plugin documentation
- Reference Docs: Full library API Reference
These may be of interest
- Similar - Using menu designer as an embedded initializer
- Similar - Using menu designer to fully manage your menu structure
- Similar - Menu Code generation for Arduino, PicoSDK, mbed
- Similar - Designing menu layouts using web designer
- Similar - Control embedded menu application from browser - embedCONTROL.js

Want to let us know about something?
- If this is a library documentation page, raise a PR on the documentation site.
- Open a discussion on the Community channels
- Contact us for problems or improvements on the main site.
Table of contents
Supporting us
We maintain several popular embedded projects and work hard to make them even better. If you're looking for commercial services, please do consider us.
Alternatively, you can buy us a coffee to say thanks.
Sharing links
Learn about TcMenu
We build and maintain an embedded menu designer and framework that works on many platforms.