TheCodersCorner.com items tagged with display-driver.
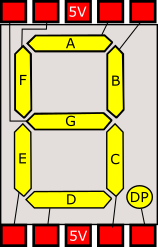
Checking if 7segment display is common anode or cathode
If you've got a 7 segment display but are not sure if it is common anode or common cathode, then you need to check the polarity of the display. This is easily done with a low voltage supply (9V or less) from a battery, bench PSU or Arduino board. Firstly and before anything else, connect a 1K resistor between the common...

LiquidCystalIO with PCF8574 i2c backpack
An I2C LCD backpack based on the PCF8574 chip provides an easy way to get started with LiquidCrystalIO on most Arduino boards. It is usually in one of two configurations as listed below. This library works correctly with the display and even has a shorthand way of creating the LCD for this case. Connectivity combinations for i2c backpacks Pin Option1 Option2...
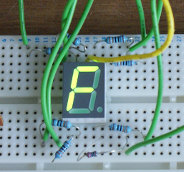
Arduino single 7 segment analog measurement example
Measuring voltage from an analog input. Following on from the previous example ( example for driving 7 segment LED displays ). we now build on the same circuit to make a simple voltage meter. Additional requirements: Potentiometer of at least 10Kohms . In order to measure voltage, we need to use an Arduino board analog input. Usually these are marked...
LiquidCystalIO with MCP32017 I2C or any other arrangement
You can connect up a device using just about any arrangement of pins or expander, at the end of the day any device supported by IoAbstraction, including MultiIo (pins and IoExpander mix) can be used here. Examples showing these use cases MCP23017 LiquidCrystal example Shift register 74HC595 LiquidCrystal Back to the main page
Liquid Crystal fork example using IO Abstraction library - examples
Recently, I have made a fork of Arduino LiquidCrystal (HD44780 display driver library) that allows the library to work with the IO abstraction library, meaning you can configure a display to use Arduino pins, an i2c 8574 IO expander or shift registers by simply changing one line of code in your sketch. There are two additional examples provided with this version...

Arduino multiple digit, 7 segment display tutorial
On the previous page covering single digit displays , we dealt with driving one 7-segment digit. On this page we'll use a multi-digit display and assume 4 digits. Just like single devices, multi-digit 7-segment displays have connections for A-G, DP and common, but they have a common pin for each digit, with one set of A-G and DP pins that are shared....
LiquidCystalIO with PicoSDK/mbed/NativeCpp over i2c or pins
LiquidCrystalIO is now also compatible with PicoSDK and mbed boards. It supports regular mbed pins, I2C backpacks based on PCF8574 and MCP23017 based connections. You can adapt any of the Arduino examples for mbed very easily, as the API is 99% the same. The most recent examples for this are in our native C++ CMake project in https://github.com/TcMenu/tcLibraryDev Back to the...
Working with Menu Item types in tcMenu
Many embedded applications need to present status and allow users to manage settings. TcMenu provides first class support for both presenting status and managing configuration/settings using menu items. It is possible to use with and without a local user interface. All menu item types can be accessed remotely, and we have a remote API, UI solutions, and connectors to commercial IoT...

Wiring a 20x4 character display to an Arduino board
In this article I describe how to wire a 20x4 character display to an Arduino. I'm assuming you are using a regular 5V 8bit Arduino, if this is not the case this article will not work for you as you'll need voltage level converters. Most character based LCD displays use the same wiring, but I can't guarantee that all will be the...

Getting started with tcMenu Turbo
Summary TcMenu Turbo is a new version of tcMenu that is designed to be more efficient and easier to use. At the core of this improvement is Menu Designer Turbo, a new web based application that allows you to create menus in a simple and intuitive way. With Turbo, we recommend that you move your menu project to generate plugin code...
These may be of interest
- Similar - Write XML with GroovyBuilder
- Similar - Wrapping JFreeChart as a Groovy builder
- Similar - Reading XML in groovy using XmlParser
- Similar - Generate an ATOM feed with GroovyBuilder
- Similar - Groovychart Bar chart with fixed colour

Supporting us
We maintain several popular embedded projects and work hard to make them even better. If you're looking for commercial services, please do consider us.
Alternatively, you can buy us a coffee to say thanks.
Sharing links
Learn about TcMenu
We build and maintain an embedded menu designer and framework that works on many platforms.
