Checking if 7segment display is common anode or cathode
If you've got a 7 segment display but are not sure if it is common anode or common cathode, then you need to check the polarity of the display. This is easily done with a low voltage supply (9V or less) from a battery, bench PSU or Arduino board. Firstly and before anything else, connect a 1K resistor between the common...
Arduino single 7 segment analog measurement example
Measuring voltage from an analog input. Following on from the previous example ( example for driving 7 segment LED displays ). we now build on the same circuit to make a simple voltage meter. Additional requirements: Potentiometer of at least 10Kohms . In order to measure voltage, we need to use an Arduino board analog input. Usually these are marked...

Arduino multiple digit, 7 segment display tutorial
On the previous page covering single digit displays , we dealt with driving one 7-segment digit. On this page we'll use a multi-digit display and assume 4 digits. Just like single devices, multi-digit 7-segment displays have connections for A-G, DP and common, but they have a common pin for each digit, with one set of A-G and DP pins that are shared....

Wiring a 20x4 character display to an Arduino board
In this article I describe how to wire a 20x4 character display to an Arduino. I'm assuming you are using a regular 5V 8bit Arduino, if this is not the case this article will not work for you as you'll need voltage level converters. Most character based LCD displays use the same wiring, but I can't guarantee that all will be the...
Arduino 7 segment LED display tutorial
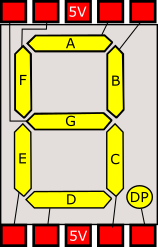
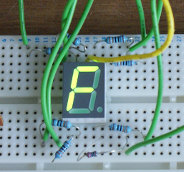
In this tutorial I show you how to connect a 7 segment display to an Arduino board. For a tutorial showing how to drive 4 or 8 digit displays see ( Arduino multiple digit, 7 segment display tutorial ). Firstly, we must know what type of display we have as there are two possible forms, common cathode and common anode. If the...
These may be of interest
- Similar - Write XML with GroovyBuilder
- Similar - Wrapping JFreeChart as a Groovy builder
- Similar - Reading XML in groovy using XmlParser
- Similar - Generate an ATOM feed with GroovyBuilder
- Similar - Groovychart Bar chart with fixed colour

Supporting us
We maintain several popular embedded projects and work hard to make them even better. If you're looking for commercial services, please do consider us.
Alternatively, you can buy us a coffee to say thanks.
Sharing links
Learn about TcMenu
We build and maintain an embedded menu designer and framework that works on many platforms.
