From the Menu Edit tab in the header, you can visually create your embedded menu in the web editor interface. From here you can adjust the menu structure, add menu items, sub-menus, and configure their properties. Any items you add will be inserted in the currently selected sub-menu. Just as with desktop designer, copy and paste works too.
In addition to adding single items, you can also add templates into your design. Templates are a way to quickly add multiple menu items at once, and can be used to create the shell of a complex menus with ease. We'll go through the whole functionality below.
With web designer you have two choices, initializer mode where once you've got the menu design ready you take it over yourself. Or round trip mode where you use the designer to create the menu and generate it.
The image below shows the menu editor, showing how it is broken into a tree, the buttons to add/remove/copy items, and the properties for each item.
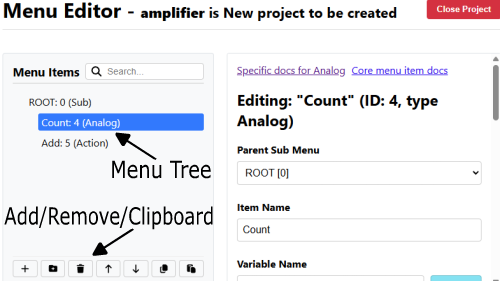
Menu Tree
The menu tree is the main area of the menu editor, it shows the current menu structure. You can navigate the tree by clicking on items, or using the arrow buttons. You can also use the search box to find items by ID or text. You can copy and paste items in the tree.
On the right, the properties for the selected item in the tree will be editable. If you select the ROOT menu item, then the properties for the project level properties will be shown instead. Here you can configure the project name, version, and other project level properties. Any changes are saved automatically. For most menu items, a link to the documentation will appear above the properties. This documentation does a deep dive into that item, including intended use, customization, and even using that item in code.
Property fields for a selected item
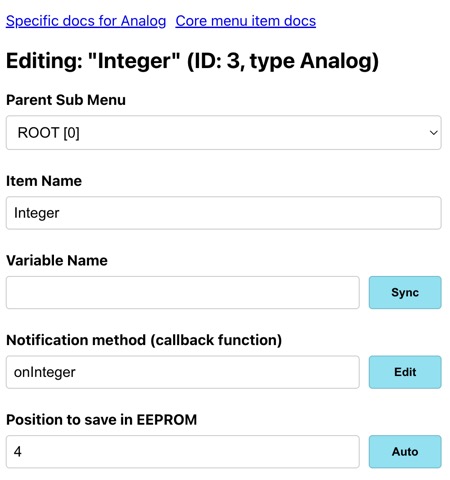
In the above image you see the properties for a menu item. The item in question is a analog item, but all items have these core properties, others have more properties. At the top of the image we see there are two links, these links take you to the documentation for the item type, and the documentation for all types of menu items. You should consult these if you're unsure how a particular type of item works.
This is part of the designer help, read the full menu item documentation to better understand how to configure and create menu items.
The parent menu drop down lets you re-home a menu item in the menu tree, use this with care, as it can cause issues/confusion if you're not careful.
The name of the item defines how it will display in the menu, it is also used by default to name any variables created by removing white space. You can explicitly set the variable name if you wish, but if you choose not to, the name will be used to make the variable. Pressing sync next to the variable name field will auto generate the field to the default.
The notification method allows you to define how an item will notify you of changes. In the simplest case this is a method that will be generated in your sketch when the item changes. See the full menu item documentation for a detailed discussion of notification options.
The position to save in EEPROM value depends on the type EEPROM storage we're using. For dynamic EEPROM support it is either DONT_SAVE or ROM_SAVE. For static EEPROM support it is the address to save the value at.
In addition to these fields, there will also be specific fields for the item being edited, these are defined in the item documentation linked above the properties.
Finally, there are a few checkboxes that we'll mention here:
- Local Only: the item should never be available over a remote connection.
- Read Only: the item is read only, and cannot be changed by the user.
- Visible: the item is visible in the menu.
- Static INFO: indicates that if possible, the static will be stored in PROGMEM.
Menu Toolbar
The toolbar is located just below the tree, and it provides buttons to add, remove, move, and copy menu items. Below is an exploded view of the toolbar which each button explained:

- Add Button: adds a single menu item into the selected submenu. When you click add item you're prompted to select the type of item to add. Once selected the item will be added to the selected submenu.
- Template add Button: adds a group of menu items into the selected submenu. As above you'll be prompted to select the template to use, once selected all the items in the template will be added to the selected submenu.
- Delete Button: removes the selected menu item from the tree.
- Direction (Up/Down): moves the selected menu item up or down in the tree.
- Copy Button: copies the selected menu item to the clipboard.
- Paste Button: pastes the menu item from the clipboard into the selected submenu.
The copy and paste format are compatible with the desktop version of designer. In addition, you can use the copy text output with the API persistence functions.
These may be of interest
- Similar - Embed Control developer version for controlling and monitoring Arduino
- Similar - Control embedded menu application from browser - embedCONTROL.js
- Similar - Using menu designer as an embedded initializer
- Similar - Menu Code generation for Arduino, PicoSDK, mbed
- Similar - Using menu designer to fully manage your menu structure

Want to let us know about something?
- If this is a library documentation page, raise a PR on the documentation site.
- Open a discussion on the Community channels
- Contact us for problems or improvements on the main site.
Table of contents
Supporting us
We maintain several popular embedded projects and work hard to make them even better. If you're looking for commercial services, please do consider us.
Alternatively, you can buy us a coffee to say thanks.
Sharing links
Learn about TcMenu
We build and maintain an embedded menu designer and framework that works on many platforms.