MenuManager contains the functions to manage menu items, there is a global instance of this class called menuMgr on Arduino and mbed boards. Here we present the most commonly used features, check out the reference docs for more details. There are a lot of iteration helper functions that can be used to navigate through menu structures. These are described further down the page. The following two reference documentation pages extend on the information here:
Enabling next and back functionality
To enable next, back or both, you provide the pin onto which you've connected the button for this function. It will essentially register additional buttons with switches on your behalf. Read through the guide for your input plugin if in doubt how it configured switches. For many input plugins this can be done within designer.
menuMgr.setNextButton(pinid_t pin);
menuMgr.setBackButton(pinid_t pin);
Controlling the menu items manually
If you need custom control over menu manager input, then you can directly call into the menu manager as if the encoder has changed value, the button has been pressed, or even acting as if back or next were pressed. Note that this is an advanced feature and although this is possible, it's often better to work with the RotaryEncoder or switches when possible.
// usually called by the encoder to indicate the current encoder position
void valueChanged(int value);
// called to indicate that the select button was pressed or help
void onMenuSelect(bool held);
// called when the back or next button is pressed
void performDirectionMove(bool dirIsBack);
Working with the title menu item
From 2.1 onwards the title item is another menu item that renders differently to regular items. It is selectable and can runs a callback when clicked, just like an action item does. For example, we often use this to display the application and version information.
void myTitleCallback(int id) {
    // title has been clicked at this point
}

// This sets the callback to be used when the title is clicked.
setTitlePressedCallback(myTitleCallback);
You can also use an inline lambda function instead of declaring the function separately as above. The ID of the title is always 0, which is the ROOT ID.
A common use case when the title is pressed is to show a dialog with the version number, from 3.1 onwards, to do this for tcMenu's version simply include tcUtil.h and call showVersionDialog(&applicationInfo).
Navigation around menus
On the device, any submenu (even root) is nothing more than a single-direction linked list of items, each item has a getNext() and the terminating item's next is nullptr. All the navigation methods expect the first item in this list. So to present a submenu, get the first child item in the linked list by calling getChild() on the sub menu. To go back to root, just call resetMenu(true). See menu item type documentation.
The navigation is controlled by the navigation manager, it is a N-deep stack of items, where we can push items on, and pop items off, it represents the current linked list we are presenting, and the active item, so that the back function feels more natural, here's an example of how it may look:
| Action | Stacked Root Item | Stacked Active Item | Now on display |
|---|---|---|---|
| Navigate To "sub1" | ROOT | sub1 (was selected) | sub1 |
| Navigate To "sub2" | sub1 | sub2 (was selected) | sub1/sub2 |
| Show dialog - action1 | sub2 | action1 (was selected) | sub1/sub2/dialog |
So above we can see that we have a stack of three, first sub1 was selected from ROOT, we then push ROOT and show sub1, then sub2 was pressed from sub1, so we push sub1 and show sub2. Lastly a dialog action was performed, at this point we push sub2 and show the dialog. As the dialog is a custom transient item, it is not added to the navigation history.
If you navigate deeply within your menu, you may need to increase the navigation stack size, it's designed by default for 3-4 level deep menus. You can do so by defining NAV_ITEM_ARRAY_SIZE to a large size.
Navigating to a given item
To navigate to a new sub menu (or root) we call:
navigateToMenu(theNewItem, possibleActive = nullptr, customMenu = false);
Where
- theMenuItem - the first child item (not submenu) that you want to show
- possibleActive - optionally an item to make active
- customMenu - if this is a menu outside of the regular menu tree (EG a structure created at runtime)
To retrieve the top most (first) menu item, or to get the currently active top menu item.
MenuItem* menuMgr.getRoot();        // the absolute top level root
MenuItem* menuMgr.getCurrentMenu(); // the current root that is on the display
Going back up the navigation stack
To pop the last menu off the stack (or to root if popBackToRoot is true)
resetMenu(popBackToRoot)
Where popBackToRoot is a boolean that when tree completely resets the menu back to the root removing all navigation history.
Building menu structures at runtime
You can create additional items at runtime, you can even create new submenus at runtime. Any item that extends from RuntimeMenuItem can easily be created on the fly.
To append a menu item immediately after an existing item you use the below function, if you are adding several at once, use the silent option to prevent displays and remotes refreshing more than once. If you use silent, then you must follow this with a call to notifyStructureChanged.
menuMgr.addMenuAfter(existingItemPtr, newItemPtr, silent);
menuMgr.notifyStructureChanged();
You can even change the local display to a menu structure completely defined at runtime by calling the following, but bear in mind these would not be remotely through the API. However, it is very handy for local security dialogs and other similar local only situations:
menuMgr.setCurrentMenu(MenuItem* firstItemPtr);
Setting wrapping / roll around
You can set the encoder either to stop at the upper and lower limits, or alternatively you can allow the value to wrap once a limit is reached, IE go from minimum back to maximum and vice-versa. To do this there are two options, firstly to configure this globally you can set:
menuMgr.setUseWrapAroundEncoder(bool wrapByDefault);
Or to enable only for some item:
menuMgr.addEncoderWrapOverride(MenuItem* item, bool wrapByDefault);
You can also check if needed if a given item would allow wrap mode:
bool isWrap = menuMgr.isWrapAroundEncoder(MenuItem* item);
This allows a great deal of control over wrapping, where you can either globally allow it and selectively disallow, or the other way around.
Listening for changes on menu manager
You can listen for menu editing and structural changes using by providing an object that implements MenuManagerObserver. You create an object that extends from that class and provide it to menu manager by calling menuMgr.addChangeNotification.
The menuEditStarting method returns a bool value, if you return true then editing starts, otherwise no action is taken, this is also called before a submenu is displayed, you can prevent it displaying by returning false.
Although it may seem slightly unusual at first, the menuEditEnded for submenus will occur after the menuEditStarted for the new menu, this because it is possible by returning false in start that the new menu will not appear.
Below is an example of implementing this observer:
class MyObserver : public MenuManagerObserver {
public:
    void structureHasChanged() override {
        Serial.println("menu tree structure changed");
    }

    bool menuEditStarting(MenuItem* item) override {
        Serial.println("Editing started");
        return true; // allow editing to start
    }

    void menuEditEnded(MenuItem* item) override {
        Serial.println("Edit committed");
    }

    void activeItemHasChanged(MenuItem* newActive) override {
        Serial.println("Active item has changed");
    }
} myObserver;

void setup() {
    // ...
    menuMgr.addChangeNotification(&myObserver);
}
Alternatively, use the commit callback function which takes the same signature as a menu item callback but is only called upon an item being committed:
menuMgr.setItemCommittedHook(MenuCallbackFn commitCallback)
Note that either of the above methods use one of the callback spaces. There is a limited number (default 4) of callbacks that can be registered, see the reference docs for more information. Be aware most renderers and remote capabilities tend to use a slot each.
Initialising the menu manager
When using the designer, this code gets added automatically, this is to fully document the API.
We initialise the menu manager as shown below, where renderer is a pointer to a renderer (or an instance of NoRenderer), root is the very first menu item and then this is followed by the pin used for either switches or the rotary encoder. Remember that pinA of the encoder must be an interrupt capable pin. If you're not using the designer, then the plugins for display and remote are available within the tcMenu code repo within the two plugin packages, or may be packaged with the embedded folder. Copy the required files into your sketch and make sure they are initialised. The full details are available in the menu manager class documentation.
menuMgr.initForEncoder(MenuRenderer* renderer, MenuItem* root, uint8_t encoderPinA, uint8_t encoderPinB, uint8_t encoderButton);
menuMgr.initForUpDownOk(MenuRenderer* renderer, MenuItem* root, uint8_t upPin,
                        uint8_t downPin, uint8_t okPin, int repeatKeyDelayTicks);
menuMgr.initWithoutInput(MenuRenderer* renderer, MenuItem* root);
So for example to initialise for no local user interface. Define a global variable:
NoRenderer noRenderer;
Now initialise for no input:
menuMgr.initWithoutInput(&noRenderer, &rootMenuItem);
How MenuManager interacts to create a multi level menu
Below we show the overall layout of a tcMenu application on an Arduino or mbed device, the various components shown below are covered in more detail in other sections, they are presented here purely to show the overall layout. Again, the code generator does most of this for you, this is to aid understanding or if you prefer to go it alone.
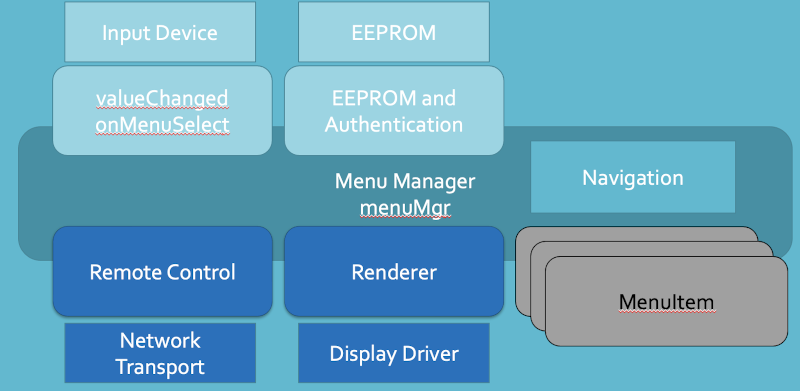
Above we see the menu manager surrounded by the components that make up a menu app. First we have the recursive menu tree, allowing for multi level menus when combined with the navigation components. Next, we see the input control that is managed using the two methods valueChanged and onMenuSelect. Usually these are fulfilled using one of the init methods mentioned earlier. Display rendering is attached to the menu manager, and uses the navigator to handle which sub menu is on display. Lastly, remote facilities are attached to the menu manager so that monitoring and control is possible.
Working with menu items
Iterating over menu items
Most of the useful functions to iterate over menu items are within the following reference documentation page, we only document the most popular ones here, so it is worth checking this page too:
MenuItemIterator - non-recursive iteration of the tree
This class allows you to go through a menu structure using a common iteration approach. The iterator is provided with a predicate filter, then each item is tested against the predicate, and any that match are returned as the next match. Let's take an example that gets all items of type AnalogMenuItem:
    MenuItemTypePredicate intPredicate(MENUTYPE_INT_VALUE, TM_EXTRA_INCLUDE_SUBMENUS);
    MenuItemIterator iterator;
    iterator.setPredicate(&intPredicate);

    auto item = iterator.nextItem();
    while(item != nullptr) {
        Serial.println(item->getId());
        item = iterator.nextItem();
    };
The first parameter to the type predicate is one of the MenuType enumeration. The second parameter is a flag that tells the predicate which mode it's working in, you can or together more than one choice:
// bit 0 represnts either regular or inverted mode (eg not a Analog item)
#define TM_REGULAR  0
#define TM_INVERTED  1

// bit 3 being on prevents entry into menus marked local only
#define TM_REGULAR_LOCAL_ONLY  8
#define TM_INVERTED_LOCAL_ONLY  9

// bit 4 being on tells the predicate to always recurse into submenus
#define TM_EXTRA_INCLUDE_SUBMENUS 16
There is another ready-made predicate that filters by remote number and changes. This is useful if you are implementing a remote facility.
RemoteNoMenuItemPredicate(int remoteNumber);
You can make your own predicate by extending from MenuItemPredicate
Getting specific menu items
Get a menu item by ID
MenuItem* getMenuItemById(int id);
Get the parent for a given item
MenuItem* getParentRoot(MenuItem* current);
Increasing menu depth
Menu iteration uses an internal queue. To save memory on the device this is limited to 4 items in depth. EG Root -> SubMenu -> SubMenu -> SubMenu. If you need deeper trees than this, you can redefine MAX_MENU_DEPTH to any value at the cost of a little memory.
Using menu delegate to work with many items at once
If you need to do the same thing to many menu items at the same time, certain operations are supported using menu item delegate, where you give the delegate a const array (not copied so must be global) and it does the same thing to each.
Many of the boolean flags are supported for read and write, and also there is a method onEachItem() that gets called for items in the delegate.
Full documentation: Menu Item Delegate docs
Examples:
First at global scope we declare the things to group:
using namespace tccore;

MenuItem*[] items = { &item1, &item2 };
MenuItemDelegate delegate(items, 2);
Example - make item1 and item2 readonly:
delegate.setReadOnly(true);
Example - check if either item1 or item2 are changed:
bool anyChange = delegate.isChanged(MenuItemDelegate::ANY);
Example - check if both item1 and item2 are local only:
bool allLocal = delegate.isLocalOnly(MenuItemDelegate::ALL);
Hopefully the examples above give some ideas how you can use the delegate, it has a lot more method covered in the documentation linked above.
These may be of interest
- Similar - Write XML with GroovyBuilder
- Similar - Wrapping JFreeChart as a Groovy builder
- Similar - Reading XML in groovy using XmlParser
- Similar - Generate an ATOM feed with GroovyBuilder
- Similar - Groovychart Bar chart with fixed colour

Want to let us know about something?
- If this is a library documentation page, raise a PR on the documentation site.
- Open a discussion on the Community channels
- Contact us for problems or improvements on the main site.
Table of contents
- Enabling next and back functionality
- Controlling the menu items manually
- Working with the title menu item
- Navigation around menus
- Building menu structures at runtime
- Setting wrapping / roll around
- Listening for changes on menu manager
- Initialising the menu manager
- How MenuManager interacts to create a multi level menu
- Working with menu items
Supporting us
We maintain several popular embedded projects and work hard to make them even better. If you're looking for commercial services, please do consider us.
Alternatively, you can buy us a coffee to say thanks.
Sharing links
Learn about TcMenu
We build and maintain an embedded menu designer and framework that works on many platforms.
