Menu Manager makes it easy to load from and save values to EEPROM between runs. Each menu item can optionally have a storage point in the EEPROM area (-1 / 0xffff means not stored). Any items that have a valid EEPROM address will be persisted upon calling the save function on menuMgr, and similarly, will be read back by calling load.
void menuMgr.load(magicKey = 0xfade, firstRunCallback = NULL);
void menuMgr.save(magicKey = 0xfade);
Where:
- magicKey this value is stored in the first two bytes of the ROM and then read back before loading. If the values do not match, no loading takes place.
- firstRunCallback is a task manager task that only called when the magic key does not match, to make any preparations needed.
NOTE: during load() the menu item callbacks are NOT run, this leads to instability because load is often called long before the application is fully initialised. We recommend your app should not rely on this behavior. However, should you wish to run the callbacks, you do so manually once your application is fully loaded, and the examples show how to do this.
Setting up EEPROM support in TcMenu Designer
EEPROM support can be added to your project by the designer UI. To change the EEPROM type used by your project, open the code generator and choose the "Change EEPROM" button highlighted in the image below.

Once you click on the above button, the following dialog will appear, where you can configure the type of EEPROM required:
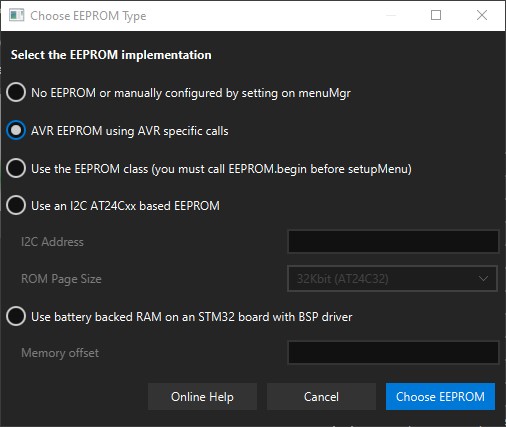
- No EEPROM - do not set an EEPROM, in this case you must not call load or save, use an EEPROM Authenticator, or any EEPROM based choice items.
- AVR EEPROM - use AVR direct EEPROM functions, the lightest option for AVR based boards.
- EEPROM class - use the
EEPROMclass that some boards support, you must callEEPROM.begin(..)before callingsetupMenu. This is generally the best option for ESP boards. - Use an I2C AT24Cx based ROM - use an I2C ROM by providing the I2C address and also the ROM page size. This will do everything apart from call
Wire.begin()which should be done before callingsetupMenuwhen required. - Battery backed RAM on STM32 - this uses the BSP driver to access the battery backed RAM on supported STM32 boards. Tested on STM32F429 and STM32F439 (Stm32Duino and mbed).
- Preferences API on ESP32 - uses the preferences library with a provided namespace and size.
Any EEPROM selected by this method will be registered with menuMgr automatically during the setupMenu() call.
However, should you wish to provide your own EEPROM implementation, you can do so by implementing the EepromAbstraction class and registering it with menuMgr using the menuMgr.setEepromRef(eepromPtr) method.
Choosing between the various EEPROM saving options
In designer, on the root menu item details (application information page) you can switch between three different modes of menu persistence. Each one is listed below with details around how they work.
Important Note: If you change this option, then you will need to manually transition any memory layouts. The recommended way to handle ROM changes is to change the magic key, and detect both formats.
EEPROM Dynamic save
Dynamic mode saves each menu item ID followed by a length and its data, this allows for unprecedented flexibility in terms of application development (IE items can be added, sizes can change); but it does come with drawbacks:
- Increased EEPROM usage: Each menu item requires additional bytes to store its ID and length (four bytes), which can lead to increased EEPROM usage. Probably the greatest concern and hence at the top.
- It is not possible to check if the value has changed since the last save and avoid writing as the position is not fixed. Again probably the second-greatest concern.
- Slower loading and saving: The dynamic save method requires more processing time to load and save menu items, as it needs to iterate through each item and its length. This should almost always be negligible.
Here is the format of each item:
| Position | Purpose | Length |
|---|---|---|
| 0 - 1 | Item ID | 2 |
| 2 - 3 | Length of data | 2 |
| 3 - Len | Item data | Len |
Example EEPROM layout showing byte positions:
- MagicKey is
0xFADE - Item ID=1, Type=Analog, Value=0x20
- Item ID=2, Type=Text, Value=Hello, Len=5
- Ending marker
0xFFFF
| Pos | Val | Meaning |
|---|---|---|
| 0x00 | 0xFA | Magic |
| 0x01 | 0xDE | |
| 0x02 | 0x00 | Item 1 |
| 0x03 | 0x01 | ID |
| 0x04 | 0x00 | Len |
| 0x05 | 0x02 | Len |
| 0x06 | 0x00 | Data |
| 0x07 | 0x20 | |
| 0x08 | 0x00 | Item 2 |
| 0x09 | 0x02 | ID |
| 0x0A | 0x00 | Len |
| 0x0B | 0x05 | Len |
| 0x0C | 'H' | Data |
| 0x0D | 'E' | |
| 0x0E | 'L' | |
| 0x0F | 'L' | |
| 0x10 | 'O' | |
| 0x11 | 0xFF | Ending |
| 0x12 | 0xFF | Marker |
| 0x13 | 0x00 | Ending |
| 0x14 | 0x00 | Len=0 |
To instantiate within menu builder: menuBuilder.usingDynamicEEPROMStorage()
Or to instantiate at directly: setEepromStorageMode(TC_STORE_ROM_DYNAMIC);
Size based EEPROM
Size mode is the same as legacy mode below, but saves an extra two bytes after the magic key, meaning for new menus the starting location is 4. These two additional bytes hold the maximum location ever written to during save. Then during load, nothing above this location will be loaded back, meaning that new items that have a higher location than the save point will not load from EEPROM, instead they will retain their default value.
To instantiate directly: setEepromStorageMode(TC_STORE_ROM_WITH_SIZE);
Legacy mode EEPROM
Saves only the magic key and then menus can start at location 2. It is however your responsibility to ensure that when new menu items are added, that you migrate between the two, using a new magic key or similar approach. The above dynamic and size based approaches have been added to handle most simple cases without the need for migrations.
You can also switch between modes directly in code:
setSizeBasedEEPROMStorageEnabled(bool enable);
Where enable controls if size based save/load should be enabled or not.
Loading and saving single menu items
You can load and save single items, there are two global functions to allow this:
bool ok =  loadMenuItem(eeprom, theItem, magicKey = 0xfade);
saveMenuItem(eeprom, theItem);
Get the EEPROM from menu manager using menuMgr.getEepromAbstraction(), and provide a pointer to a single menu item.
Setting up EEPROM support manually
It's usually best to use the inbuilt support in TcMenu Designer as described above. However, you can also manually add the support too. In order to use any EEPROM functions, or to use EEPROM based choice menu items, you need to set up an EepromAbstraction and provide a pointer to menuMgr using setEepromRef. For details of how to create an EepromAbstraction see AVR and Arduino EEPROM example and I2C AT24 EEPROM example.
// before making any call to load or save, or before using ChoiceMenuItems
menuMgr.setEepromRef(eepromPtr);
Loading or saving a single menu item
Note: it is not possible to load or save single items with dynamic mode.
In order to load or save single items include the following header
#include <EepromItemStorage.h>
This includes the helper functions used by menu manager, that allow for working with EEPROM storage, note that saving a single item requires TcMenu 3.0 or above.
bool loadMenuItem(EepromAbstraction* eeprom, MenuItem* theItem, uint16_t magicKey = 0xfade);
void saveMenuItem(EepromAbstraction* eeprom, MenuItem* theItem);
Where
- eeprom is the EEPROM abstraction, in most cases use
menuMgr.getEepromAbstraction()for this. - theItem is a pointer to the item to be saved/loaded.
- magicKey is as above.
NOTE on single save it is assumed that the magic key has been written out at some point in the past by using the full save feature.
Special cases and other details
See the reference docs about EeepromAbstraction
Should you need to use EEPROM functions before initialisation, you can set the root menu item before initialise for this special case. In this case, should need to use the menuMgr load function, as you must either set the EEPROM reference yourself as above, or call the overload of the load function that takes a pointer to an EepromAbstraction.
menuMgr.setRootMenu(rootItem);
A frequent question that is asked is 'how should I call save to ensure that all menu item state is stored'. The best way to do this is to use a power loss detection circuit and call save in that call back. The second best is to have a timed function (maybe once every 10 minutes) along with a commit handler that detects changes. Never call save in the menu item callback, if using a rotary encoder that would break your EEPROM in days.
These may be of interest
- Similar - Embed Control developer version for controlling and monitoring Arduino
- Similar - Control embedded menu application from browser - embedCONTROL.js
- Similar - Using menu designer as an embedded initializer
- Similar - Designing menu layouts using web designer
- Similar - Menu Code generation for Arduino, PicoSDK, mbed

Want to let us know about something?
- If this is a library documentation page, raise a PR on the documentation site.
- Open a discussion on the Community channels
- Contact us for problems or improvements on the main site.
Table of contents
Supporting us
We maintain several popular embedded projects and work hard to make them even better. If you're looking for commercial services, please do consider us.
Alternatively, you can buy us a coffee to say thanks.
Sharing links
Learn about TcMenu
We build and maintain an embedded menu designer and framework that works on many platforms.