You can secure both sub-menu items and remote connections using an Authenticator. In summary, when an authenticator is present on menuMgr any attempt to show a secure sub menu will result in a dialog asking for the pin; only proceeding to display the sub menu if the pin matches the on in authenticator. In addition, all remote/IoT connections will only be allowed if the authenticator approves the connection. An example of the secure sub-menu pin entry screen is below:
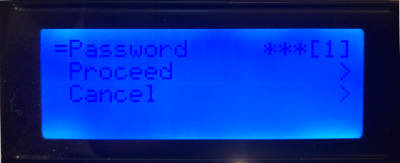
Notice that in the above secure pin entry screen, the pin as entered shows with the '*' character instead of what was entered, except for the current character that you are editing. After the last character is entered, select the lowest value (empty) which terminates editing. Now select Proceed.
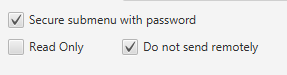
To secure a sub-menu in designer simply select the menu you wish to secure and tick the "secure submenu with password" check box. Although not mandatory, it is recommended that you also tick the "do not send remotely" checkbox to ensure they can only display locally.
When remote connectivity is added to a menu then the authenticator has a second job, that is to determine if the client that is connecting should be allowed. Every client has a UUID and a name, and it is these two together that uniquely identify a remote client.
Different types of authenticator
There are three different authenticators built in to the core of TcMenu, each one provides the same core functionality, that is to store and verify the pin for submenus, and also to check if a connection from a given client UUID and name should be established. They all implement the AuthenticationManager interface. You can browse the class hierarchy using the link.
No Authentication
Allows all remote connections, and any pin combination. Should only be used when no secure menu items exist and remote connections do not need to be secured.
EEPROM Authentication
Stores the pin and the paired remote connection details in EEPROM (the current EEPROM setup for use in menuMgr) starting at a given location. This is usually configured with an address in EEPROM and the number of remote pairing entries to keep. The pin-number is initially "1234" until changed, and it will initially have no paired remote. Each time a remote system successfully pairs with your application, it will store the client details in a free slot.
This kind of authentication also has a helper menu item that presents the remote authentication details in a list; which you can add to your menu structure by selecting "EEPROM Authentication editor" from the add new menu item dialog.
Read Only Authentication
Stores the pin and a pre-defined array of remote connection details in FLASH. As these are read only they must be defined at compile time and cannot be altered after that. Use this option when you wish to lock down the device to the fewest number of clients possible.
Add authentication directly in TcMenu Designer
From version 2.2 onwards authentication can be added to you project by the designer UI. To change the authenticator used by your project, open the code generator and choose the "Change Auth" button highlighted in the image below.

Once selected the following dialog will be presented:
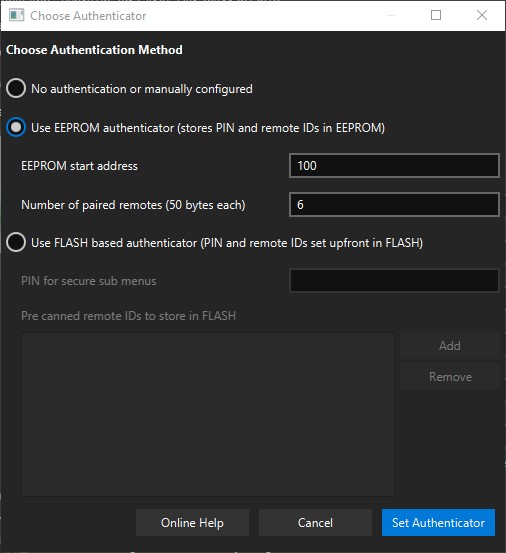
You can choose between the authentication options as listed out in the above section.
- For no authentication there are no additional parameters to set.
- For EEPROM authentication you just set the position in EEPROM, and the number of remote pairings to store. Each remote pairing is the UUID and name of a remote connection, and they take about 60 bytes each as a guide.
- For FLASH authentication, you first set the pin that will be required to access secure sub menus. Then you can enter remote connection UUID and name pairs by pressing "Add" to enter a new pair. This will then allow those clients to access the device.
That's it, code generator will do everything else for you!
Add authentication manually in code
In most cases using the code generator option should be preferred. However, should you prefer to manually code the Authentication into your project code, then this guide acts as a good starting point, along with the reference docs.
If you want to support authentication and save the credentials that have been paired between power offs, then use the EepromAuthenticatorManager as follows:
// Variable declaration - must be globally visible
EepromAuthenticatorManager eepromAuth;

// then during setup
eepromAuth.initialise(&eepromAbstraction, startLocationInRom);
If you don't want any authentication whatsoever, there is nothing to do, that is the default state. However, if you want to be explicit, you set up as follows:
// Variable declaration - must be globally visible
NoAuthenticationManager noAuth;
If you want to authenticate against a few known application instances (name, UUID pairs), without allowing pairing of additional devices then you can use the the ReadOnlyAuthenticationManager. To use it we simply create an array of AuthBlock and pass it to the constructor.
// Variable declarations - must be globally visible
const AuthBlock authBlocks[] PROGMEM = {
    { "name1", "11111111-1111-1111-1111-111111111111" },
    { "name2", "22222222-2222-2222-2222-222222222222" }
};
int authArrayLength = 2;
const char secureMenuPassword[] PROGMEM = "1234";
ReadOnlyAuthenticationManager roAuth(authBlocks, authArrayLength, secureMenuPassword);
Alternatively, if you are not interested in any remote pairings, but just want a read only authenticator to deal with secure menu passwords, simply construct as follows instead:
const char secureMenuPassword[] PROGMEM = "1234";
ReadOnlyAuthenticationManager roAuth(secureMenuPassword);
Lastly, as we've manually created the item, we need to ensure that the authenticator is added to the menuMgr object as follows in the setup of your sketch:
menuMgr.setAuthenticator(&authManager);
These may be of interest
- Similar - Write XML with GroovyBuilder
- Similar - Wrapping JFreeChart as a Groovy builder
- Similar - Reading XML in groovy using XmlParser
- Similar - Generate an ATOM feed with GroovyBuilder
- Similar - Groovychart Bar chart with fixed colour

Want to let us know about something?
- If this is a library documentation page, raise a PR on the documentation site.
- Open a discussion on the Community channels
- Contact us for problems or improvements on the main site.
Table of contents
Supporting us
We maintain several popular embedded projects and work hard to make them even better. If you're looking for commercial services, please do consider us.
Alternatively, you can buy us a coffee to say thanks.
Sharing links
Learn about TcMenu
We build and maintain an embedded menu designer and framework that works on many platforms.
