As part of TcMenu we provide a utility that can create bitmaps, fonts and title widgets. It can take most common file formats as its source, and convert them to a format suitable for use in tcMenu (and many other libraries too). It can create header files for bitmaps or title widgets to either the clipboard or a file. Let's first go through what it can create at the moment.
At the moment it is only packaged as a nightly build, you can install the latest nightly from our site. However, our aim is to make it available in Mac and Windows stores soon. It is also available in tcMenu designer from the Code menu.
Using the user interface
Below, I present the dialog that will appear once the bitmap creation tool is loaded. We'll study each section of it in detail.

Importing images and managing images
To add an image either copy an image from a tool such as GIMP or other editing package onto the clipboard, then paste it into the window using CTRL-V (macOS use CMD-V) or choose "Load Image" to load from a file. This will open the following dialog:
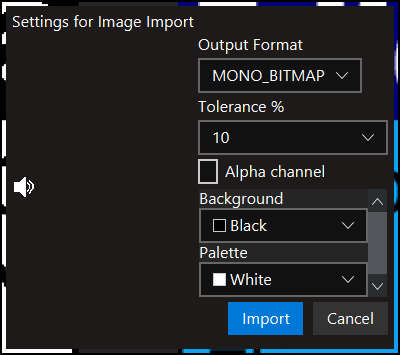
On the left is the image to import. Now you can choose the format that it should be converted into. If you choose a palette based image, it is best that the image is already converted to have that number of colors using your preferred tool. Although TcMenu will attempt to do this for you, it will not be anywhere near as good as a fully fledged image editor at this.
The tolerance defines how much difference to "allow" when choosing a color. Alpha channel defines if the alpha channel data should be ignored or honoured. Finally, pressing import will import the image.
Pixel/output formats
Both the user interface and the library code can handle the following bitmap formats:
- XBMP monochrome format (LSB first)
- Monochrome bitmap (MSB first)
- Palette based, two bit per pixel - 4 color.
- Palette based, four bit per pixel - 16 color
Exporting Bitmaps as code
In this case each bitmap you have visible in the Window will be generated as an array of uint8_t in your chosen format. If you chose a palette based output, then the palette entries will be written as well as an array of color_t. You can include this generated source into your project and draw the bitmap using the code below.
Exporting a Title widget as code
Important: title widgets must always be in XBM format.
TcMenu can present one or more title widgets in the upper right of the menu, see further down for a full description of title widgets. An important note is that all images must be exactly the same size. If they are not, the icons will not present properly. For the variable name there is no need to put "Widget" on the end, it will be appended automatically. Code will be export either to a file or clipboard depending if "create bitmaps on clipboard" is checked.
Bitmap creation and editing - 4.3 onwards
You can create a new bitmap by pressing "New Image", this provides a dialog where the size of the image and intended format can be configured, on pressing create the new bitmap will be added to the main panel. Once created follow the steps below.
Editing an existing bitmap
You can edit and remove bitmaps from the main panel by using the "edit" and "remove" buttons that are above the image. Pressing "edit" takes you to a new image editor panel, which has very basic editing capabilities. It is not designed for more than simple icon creation and image touch up. The editor is shown below:
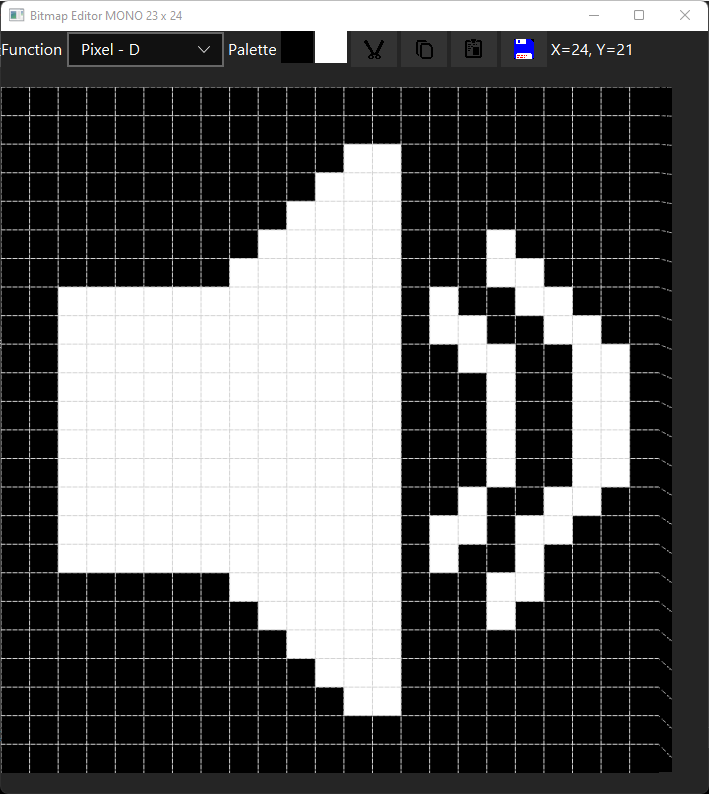
Using this panel you can touch up images in any supported format. The function can be selected either from the keyboard on combobox as follows:
- Drawing one pixel at a time - D
- Drawing a line - L
- Drawing a box outline - R
- Drawing a filled box - B
- Drawing a circle - I
- Flood fill an area - F
- Select an area of the image - E
You can use normal clipboard operations, either by pressing the cut, copy, paste buttons, or using the regular keyboard shortcuts. Further, you can save any image loaded into the panel as a PNG file.
Drawing takes place in the selected color, you change this by clicking on a color in the palette. You can edit the palette by double-clicking in the palette area. You can also select the first 9 colors from the keyboard by pressing keys 1 through 9, and pressing 0 brings up the palette editor.
How to use bitmaps in your code
XBM - X-Bitmap format
This format is supported by most libraries directly. Adafruit_GFX, U8G2 and TFT_eSPI can all draw XBM given just the width and height. Consult the documentation of the library for the exact function to use in each case.
Using XBM with a TcMenu device drawable is also trivial, and works on all supported display libraries, given a DeviceDrawable obtained from a renderer, you'd simply call:
drawable->drawXBitmap(Coord(xLoc,yLoc), Coord(width, height), xbmpData);
Read more about tcMenu device drawable.
Drawing other types of bitmap using a DrawableIcon
All bitmaps other than XBM format are drawn using drawBitmap and DrawableIcon. We first create a drawable icon object that represents what we want to draw:
DrawableIcon myMonoIcon(0, Coord(width, height), iconType, regularIconBytes [, selectedIconBytes]);

color_t palette[] = { RGB(0, 0, 0), ... };
DrawableIcon myPaletteIcon(0, Coord(width, height), iconType, palette, regularIconBytes [, selectedIconBytes]);

drawable->drawBitmap(Coord(xLoc, yLoc), &myIcon, isSelected);
Where iconType is one of ICON_XBITMAP, ICON_MONO, ICON_PALLETE_2BPP, ICON_PALLETE_4BPP, ICON_NATIVE. Consult the reference documentation for more details on each option. But importantly, if you use either of the palette types, you must use the version of the constructor that provides a palette. The palette is assumed to be an array or color_t that is at least as large as the number of colors provided.
How to use title widgets in your code
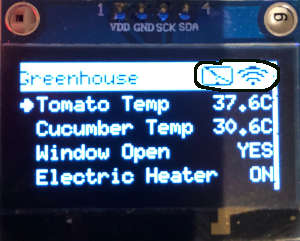
For all displays including LiquidCrystal we support the concept of title widgets. Title widgets allow a small icon to be presented in the title area that can have a number of states. A non-exhaustive list of examples of this:
- Wifi signal strength indicator (see the esp8266 example).
- Current Connection status icon (see many of the examples).
- Power or battery indicator.
Here's an example OLED display showing two widgets:
You can build title widgets using the above bitmap/font editor tool, it outputs everything needed along with the actual TitleWidget itself. However, below the creation process is explained in full.
Each TitleWidget has an array of icons that represent the states. Each icon should first be defined:
const uint8_t iconData1[] PROGMEM = { 0, 0, 0 etc };
const uint8_t iconData2[] PROGMEM = { 0, 0, 0 etc };
Following this, we then define the array of icons, the icons are in XBM format (Xbitmap), GIMP can export in this format:
const uint8_t* const iconsData[] PROGMEM = { iconData1, iconData2 };
Lastly we then define a TitleWidget that represents this icon state:
TitleWidget iconsWidget(iconsData, numOfIcons, width, height);
Where the iconsData is the above generated array of icons, followed by the numbe of icons, the width of each icon and the height of each icon. Note all icons must be the same size.
Then we add those icons:
auto& themeBuilder = TcThemeBuilder(renderer);  // Create a theme builder
themeBuilder.addingTitleWidget(iconsWidget);    // Add the above widget
themeBuilder.addingTitleWidget(anotherWidget);  // You could add more as needed
Where renderer is the graphics device renderer, it is exported in the projects menu.h.
To change the state of a widget, simply call its setter method:
iconsWidget.setCurrentState(iconNumZeroBased);
Default icon sets
There are default icons for both WiFi strength and connection state included that work for a wide range of displays.
Icons for low resolution displays such as Nokia 5110:
#include "stockIcons/wifiAndConnectionIcons8x7.h"
Icons for higher resolution displays such as TFT and OLED:
#include "stockIcons/wifiAndConnectionIcons16x10.h"
Icons for 5x8 LiquidCrystal / HD44780 displays:
#include "stockIcons/wifiAndConnectionIconsLCD.h"
In each file there are two icon sets defined.
// a set of wifi icons, 0 is not connected, 1..4 are low to high strength
const uint8_t* const iconsWifi[] PROGMEM = { iconWifiNotConnected, iconWifiLowSignal, iconWifiMedSignal, iconWifiStrongSignal, iconWifiBestSignal };

// a boolean not connected (0) or connected (1) icon
const uint8_t* const iconsConnection[] PROGMEM = { iconDisconnected, iconConnected };
For some sizes (but not all) we also define an icon for ethernet state (wired connection):
const uint8_t* const iconsEthernetConnection[] PROGMEM = { iconEthernetNone, iconEthernetConn };
These may be of interest
- Similar - Write XML with GroovyBuilder
- Similar - Wrapping JFreeChart as a Groovy builder
- Similar - Reading XML in groovy using XmlParser
- Similar - Generate an ATOM feed with GroovyBuilder
- Similar - Groovychart Bar chart with fixed colour

Want to let us know about something?
- If this is a library documentation page, raise a PR on the documentation site.
- Open a discussion on the Community channels
- Contact us for problems or improvements on the main site.
Table of contents
Supporting us
We maintain several popular embedded projects and work hard to make them even better. If you're looking for commercial services, please do consider us.
Alternatively, you can buy us a coffee to say thanks.
Sharing links
Learn about TcMenu
We build and maintain an embedded menu designer and framework that works on many platforms.
