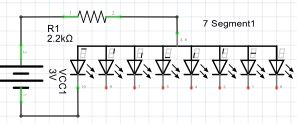
If you've got a 7 segment display but are not sure if it is common anode or common cathode, then you need to check the polarity of the display. This is easily done with a low voltage supply (9V or less) from a battery, bench PSU or Arduino board.

If no segment lights up then you need to reverse the wiring. So swap the two wires over on the battery or supply, if the LED lights up now it is common CATHODE.
If the LED has not lit up in either example then it is potentially broken. You can check all segments are working using the same technique, just connect to each of the A-G pins in turn (using the correct polarity of course).
If your display is common ANODE, then you'll have to reverse the logic when you write to it, as a HIGH value will be OFF, and a LOW value will be ON.
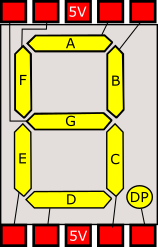
Pinouts used for most 7segment displays
For most displays, the wiring will look somewhat like the example. Below is a graphical diagram that shows the standard letter assigned to each of the segments and a very common wiring arrangement.

Hopefully, this has helped you work out what type of display you've got, and now you can get back to business.
Other pages within this category
- Checking if 7segment display is common anode or cathode
- Arduino single 7 segment analog measurement example
- Arduino multiple digit, 7 segment display tutorial
- Wiring a 20x4 character display to an Arduino board
- Arduino 7 segment LED display tutorial

