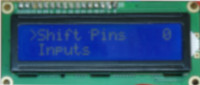
In this guide we show how to render menu items using LiquidCrystalIO library, onto displays compatible with HD44780 (often referred to as LCD). This rendering driver is built into the core menu designer download, meaning it's available out of the box.
The LiquidCrystalIO library is a fork of the LiquidCrystal library, with a few additional capabilities. Most importantly, updating HD44780 displays is slow, think 270Khz slow. This library avoids long pauses by using task manager for managing these delays, so is uniquely able to keep your tasks running. In addition, it supports device pins, PCF8574, MCP23017, AW9523 and some have even used with our shift register pin abstraction!
If you are connecting the device directly to your Arduino here's a wiring guide for 20x4 and 16x2 units
Configuring the rendering for your display
First, ensure your menu structure is saved and then choose Code -> Generate Code from the menu. Once the code generation dialog appears, to the right of the current display type will be a button named "Change". Click this button and choose one of the following new drivers by clicking select on the right.
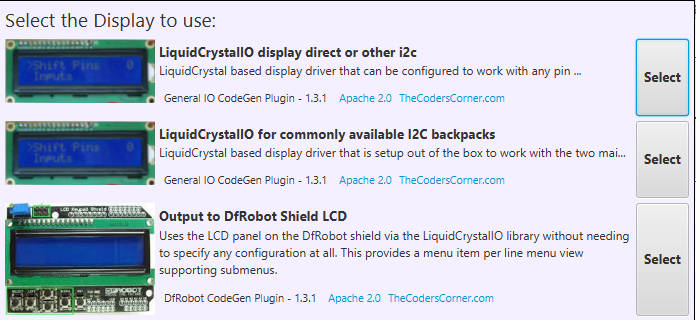
- The "display direct or other i2c" option is for the situation where you either have a non-standard i2c arrangement, or are using Arduino pins other than the DFRobot layout.
- The "commonly available i2c option" is for standard I2C backpacks, that adhere to the regular layout.
- The last option is for when you have a DF Robot shield wired to a compatible device.
Depending on which of the above options you picked, some additional properties may be added:
Additional sources of documentation specific to this version, don't forget that our fork is largely compatible with the original, so you can browse the many docs for that too:
For Display direct or non-standard I2C

- D4-D7, RS, RW and EN pins: These set the pins onto which you have connected the various display pins. Take note from your wiring of which pins you have used and configure them here.
- LCD_BACKLIGHT: Optionally allows the backlight pin to be set. If you don't have a backlight leave as -1. If you want to use a custom backlight (such as PWM or AW9523 LED control) leave as -1 here and set this up yourself after setupMenu() has finished.
- LCD_PWM_PIN: Allows for automatic use of PWM contrast, see the link to the wiring guide above (leave at -1 if not used).
- LCD_IO_DEVICE: If you're using a non-standard I2C / SPI expander arrangement, you can set it up in your sketch as an IoAbstractionRef and refer to it here. See configuring an IoAbstractionRef for that device. This parameter can be left blank, but if it is set, you must create an IoAbstractionRef as a global variable in your code.
See the takeOverDisplay example packaged with the menu library.
For Commonly available I2C (PCF8574 backpack)

- LCD_WIDTH, LCD_HEIGHT: Set these to the width and height of your display. For example 16x2 or 20x4.
- I2C_ADDRESS: Sets the I2C address that your display is on, often 0x20.
- PIN_LAYOUT: I2C displays mainly fall into two categories, either with EN on pin0, or RS on pin 0. Try each of these if you are not sure. If your display does not work with either, use the above "display direct or non standard i2c option".
For commonly available backpacks there are fewer configuration items to change. Firstly, the width and height of the display must be set along wi
Using Analog / PWM backlight
You can use an analog PWM backlight to control display brightness. It goes without saying that the pin must be able to support the feature. Here we cover the device pins and AW9523 LCD controller cases:
For device pins in setup as follows:
// DF robot back light is on pin 10, which is PWM
myLcd.configureAnalogBacklight(internalAnalogIo(), 10);
For AW9523 LED controller mode:
// GLOBALLY define this variable giving a reference to the actual IO device
AW9523AnalogAbstraction myAw9523Analog(myAw9523Device);

// later in setup configure the backligh
myLcd.configureAnalogBacklight(&myAw9523Analog, backlightPin);
And in either case, you control the level as follows:
myLcd.setBacklight(128);
The levels for the backlight are between 0..255 regardless of the analog range of the device.
These may be of interest
- Similar - Write XML with GroovyBuilder
- Similar - Wrapping JFreeChart as a Groovy builder
- Similar - Reading XML in groovy using XmlParser
- Similar - Generate an ATOM feed with GroovyBuilder
- Similar - Groovychart Bar chart with fixed colour

Want to let us know about something?
- If this is a library documentation page, raise a PR on the documentation site.
- Open a discussion on the Community channels
- Contact us for problems or improvements on the main site.
Table of contents
Supporting us
We maintain several popular embedded projects and work hard to make them even better. If you're looking for commercial services, please do consider us.
Alternatively, you can buy us a coffee to say thanks.
Sharing links
Learn about TcMenu
We build and maintain an embedded menu designer and framework that works on many platforms.
