Worked example: Building a timer
For this example we will create a menu that has two top level menu items; a counter which counts down from the selected value, and a Boolean switch that turns on or off the countdown. It will also have a submenu with one menu item to control the notification method. So lets draw this out conceptually below
menu root
  +- countdown, integer values 0 to 1000 seconds
  +- enabled, boolean YES, NO.
  +- settings (sub menu)
      +- alert (one of SOUND, LIGHT, BOTH)
Getting started and adding the countdown item
Create a new Arduino project in your sketches area, start a new project in the TcMenu editor and save it into the
new Arduino project directory. It will create an EMF file with the chosen name in that directory.
Ensure Root is selected in the tree and press the + button from the toolbar (2). We want a numeric item so choose
"Analog Item" as the type. Once you press ok a new menu item should be created and selected in the tree.
In the editor area (4) change:
- Change the name field to Countdown.
- We don’t want to save this value to eeprom, so leave it at -1.
- Maximum value is the maximum zero based value allowable. Set this to 1000.
- Offset is an amount that is added to the current value for display only. Set to 0.
- Divisor is applied for display purposes only. Set to 2. 0 or 1 is no divisor.
- Unit is for display purposes and appears directly after the number. In this case set to “s”.
Adding the enabled field
We are now ready to create the second item. Again press the + button from the toolbar (2) to create a second item, this time choose BooleanMenuItem as the type and press create. In the editor area (4):
- Change the name field to Enabled.
- Leave the eeprom setting at -1.
- Set the naming to YES / NO.
Adding the submenu and the notification field.
Now, we create the submenu by choosing the + button again, this time choose Sub menu as the type and press create. Change the name to Settings and leave all other fields as is.
Ensuring the newly created submenu is selected, press the + button again, this time choose Enumeration item and press create. In the editor area:
- Change the name field to Notification
- Change the eeprom to 2
- Change the function to onNotificationChange
- In the Values area, press the Add button to add a new entry to the combo
- Double click to edit the newly created value, and change to Sound
- Add another item and change it to Light
- Add another item and change it to Both
At this point we have finished creating the menu, we now move on to generating code.
Eeprom Ranges and generating code
When generating eeprom values, note that values 0 and 1 are reserved for a "magic key". This is so that load knows if the eeprom is still intact at startup. If you need to change the magic key it's defined in the tcMenu headers.
Before generating code, it is advisable to check the ID and eeprom ranges, to ensure there are no overlaps. To do this, from the Code menu choose "Show ID and Rom Layout"; which will pop up the following dialog:

On the left you see the IDs laid out in numeric order, and on the right the rom layout. If there are any overlaps in the rom, I.E. a value that overlaps with another, it is highlighted in red. Any overlaps should be changed before generating code.
Generating code for Arduino
Finally, we get to generating the code for Arduino. Choose Code/Generate Code from the menu. You should see a dialog similar to the following:
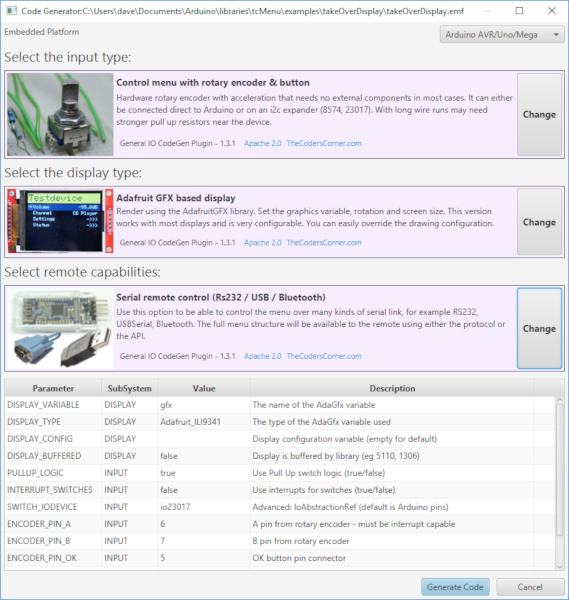
Once this dialog appears you'll notice it's split into roughly two areas, the platform and hardware choices, and the properties that need to be defined for those choices.
Adjusting the Platform choices
- At the very top is the directory where the Arduino .INO file will be generated, it's based on where you saved the menu file. Any existing INO file in that directory will be backed up before adjusting it.
- Embedded Platform sets the type of board to be targeted. Currently, only arduino is supported. The display and input are filtered down so only compatible technologies are left.
- Display type chooses the type of display to use, for example LiquidCrystalIO for HD44870 displays, U8G2 for OLED / Monochrome units or Adafruit_GFX for graphical units.
- Input technology the method of input to be used, at the moment UP/DOWN switches, Rotary encoder, Analog Joystick or no input. See the quick start guide if you need example circuits for this.
- Remote capabilities here you can choose to add remote capabilities to your menu, so it can be controlled remotely using either the Controller app, our Java API or writing to the protocol, Ethernet2, UipEthernet, ESP WiFi and most forms of Serial (anything extending from Stream) are supported.
Properties to define
Once all the above choices are set, you need to define the parameters that will be used by these plugins. In order to do this, you need to fill in the properties table (lower part of dialog) with your values. Notice each row in the list has a description along with the variable name, so you know what it's for. These values will be saved into your project file (don't forget to press save after leaving the generator)!
Starting Code generation
Press the generate button, a new window should popup, that logs the code generation run. Once complete the menu files and the sketch should be generated. At this point, as long as all the properties were defined above, and the circuit is built, you should have a functioning menu to build in your favorite IDE!
Hope you enjoy using TcMenu!
These may be of interest
- Similar - Embed Control developer version for controlling and monitoring Arduino
- Similar - Control embedded menu application from browser - embedCONTROL.js
- Similar - Getting started with tcMenu Turbo
- Similar - TcUnicode Font format documentation
- Similar - Text pipelines for drawing with tcUnicode

Want to let us know about something?
- If this is a library documentation page, raise a PR on the documentation site.
- Open a discussion on the Community channels
- Contact us for problems or improvements on the main site.
Table of contents
Supporting us
We maintain several popular embedded projects and work hard to make them even better. If you're looking for commercial services, please do consider us.
Alternatively, you can buy us a coffee to say thanks.
Sharing links
Learn about TcMenu
We build and maintain an embedded menu designer and framework that works on many platforms.
