Introduction - Java Remote control
The Java API contains domain and state objects that represent the items in your application along with the current value of that item. Whether used locally or remotely you use a menu tree to represent items. Whichever way, the menu structure accurately represents the structure in designer, because the Arduino embedded menu designer uses this API.
The remote communication protocol is fully documented for use in any language. If you'd like to help with porting please get in touch through github or my contact form, I'd be glad to help you get started with the protocol layer. We have a Java and Typescript implementation, and if anyone is genuinely interested in helping finish it, the shell of a C# implementation.
How the Java API maps to the type system
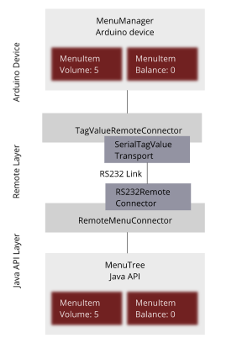
Below is a block diagram showing the high level components of a menu with remote control capabilities. It looks complex, but don't worry as the designer UI does much of the work on the Arduino side for you. Furthermore, simple builders make it really to setup in Java.
Getting the Java API
I'm assuming you've already followed at least the Quick Start guide, and got a menu deployed to an Arduino or other board. If not you'll have nothing to connect to. You should also at least skim read about the menu type system as we'll not cover it again.
If you are using Maven or Gradle then add the following dependency to your project:
   <dependency>
        <groupId>com.thecoderscorner.tcmenu</groupId>
        <artifactId>tcMenuJavaAPI</artifactId>
    </dependency>
Optionally, some additional components for RS232 communication and building user interfaces are located in the embedControlCore project:
   <dependency>
        <groupId>com.thecoderscorner.tcmenu</groupId>
        <artifactId>embedCONTROLCore</artifactId>
    </dependency>
Although not recommended, you can copy the library from GitHub manually. Full javadoc and source are available with the above dependency. These two libraries require JDK 11 and use the system logging framework, which can easily be configured to a wide range of logging packages. The default backs onto java.util.logging.
Getting started with the API
In the Java API menu items are managed by a MenuTree instance, each connection to an Arduino has its own tree, as otherwise the ID's would overlap. Menu's are represented as a ROOT menu and submenu's, the MenuTree controls where in this tree of menus each MenuItem sits. MenuItem is the base class of all menu item instances. We draw a simplified hierarchy below - see the full heirachy in the refdocs:
MenuItem
    AnalogMenuItem          -- holds numeric values
    EnumMenuItem            -- holds choices
    BooleanMenuItem         -- true / false,  yes / no, on / off
    FloatMenuItem           -- a floating point value (not editable)
    ActionMenuItem          -- an executable menu item with no status.
    RuntimeMenuItem         -- All runtime types extend from here
        RuntimeListMenuItem -- a list of items sent from the server
        TextMenuItem        -- textual values and IP addresses
        SubMenuItem         -- holds more menu items (like a directory)
Importantly, all the items are immutable, this means they can be used safely across threads as a new object gets created every time. If a change in the menu item does occur (infrequently) you'll be notified of the new menu item. However, the current value associated with a menu item changes frequently, this is accessed via the state. To get the current value and status of a menu item, use the MenuState which is obtained from the MenuTree.
When you want to make a change to a remote value, you do not need to update the menu item or it's state, send a command to the device, and it will be reflected back in the menu item state once applied.
There are two examples that you can look at to get started:
- Standalone RS232 Example
- Consult the Java docs that are shipped with the API.
Connecting remotely
If authentication is enabled on the embedded side, before any connection can be initiated we must ensure that the application has been paired with the Arduino / embedded device. No connection will be possible otherwise. See the notes below on how to arrange for pairing through the API.
In order to connect with An Arduino we need a RemoteConnector and a MenuTree. Typically, the menu tree will be populated with the menu items by the remote connector, and then we register for changes or make changes to the items.
Creating an Ethernet Socket controller
When generating the Arduino side of the software, ensure that the ethernet socket is chosen for remote access. Now enter the port on which you wish to listen for connections, default is 3333. Here is the example code to create a connection on the Java side:
var menuTree = new MenuTree();
var controller = new SocketControllerBuilder()
        .withAddress(ipAddress)
        .withPort(port)
        .withLocalName("myApp")
        .withUUID(myUUID)
        .withMenuTree(menuTree)
        .build(); // see note below
If you need to create a connection for pairing, then instead of build call:
// you can initiate pairing with an optional pairing listener, if you don't wish to be
// informed of progress just set to Optional's EMPTY.
boolean paired = attemptPairing(Optional<Consumer<PairingHelper.PairingState>> maybePairingListener);
Creating an rs232 backed controller
When generating the Arduino side of the software, make sure that rs232 communication is chosen. It will default to the default port and 115200 baud. You can change to any other serial port as long as it extends Stream, which nearly all do. This would include most Bluetooth serial facilities. Here is the example code to create a connection on the Java side:
var menuTree = new MenuTree();
var controller = new Rs232ControllerBuilder()
        .withRs232(portName, baud)
        .withMenuTree(menuTree)
        .withUUID(myUUID)
        .withLocalName("myApp")
        .build();
If you need to create a connection for pairing, then instead of build call:
// you can initiate pairing with an optional pairing listener, if you don't wish to be
// informed of progress just set to Optional's EMPTY.
boolean paired = attemptPairing(Optional<Consumer<PairingHelper.PairingState>> maybePairingListener);
Starting the controller and receiving events
Once everything is ready, we add a remote listener and start the controller for it to connect:
        controller.addListener(new RemoteControllerListener() {...});
        controller.start();
The remote listener interface is:
public interface RemoteControllerListener {
    // called when a menu item has changed, value only indicates if the MenuItem has changed
    // or only the value (state) has changed
    void menuItemChanged(MenuItem item, boolean valueOnly);

    // called when the tree is fully populated
    void treeFullyPopulated();

    // called when we have either connected or disconnected.
    void connectionState(RemoteInformation remoteInformation, boolean connected);

    // called when a dialog is shown or hidden
    void dialogUpdate(DialogMode mode, String header, String buffer, MenuButtonType btn1, MenuButtonType btn2);

    //called when an acknowledgement has been recevied
    void ackReceived(CorrelationId key, MenuItem item, AckStatus status);
}
This is the minimum required code to connect!
Finding and querying MenuItems
The root level has a special MenuItem that never appears in the tree defined as MenuTree.ROOT. Whenever you want to get all the top level items, request using that key.
To find a given item by it's ID:
Optional<MenuItem> item = tree.getMenuById(idToFind);

// or if you prefer functionally
tree.getMenuByItem(idToFind).ifPresent(item -> {
    // deal with item here..
});
For example to get all root elements as a list:
List<MenuItem> menuItems = menuTree.getMenuItems(MenuTree.ROOT);
Another example to go through every single menu item regardless of level:
    // here we first traverse through all the submenus (even ROOT is a submenu)!
    menuTree.getAllSubMenus().forEach(subMenu -> {
        logger.info("SubMenu {} has the following child elements", subMenu);
        // and then we go through all the items within that submenu.
        menuTree.getMenuItems(subMenu).forEach(item -> logger.info("----->>> " + item));
    });
To get the value associated with a menu item we get it's current state from the menuTree. It's state stores the current value and also if it has changed or is active. Here are examples:
    MenuState<Integer> menuState = menuTree.getMenuState(anAnalogMenuItem);  OR
    MenuState<Boolean> menuState = menuTree.getMenuState(aBooleanMenuItem);  OR
    MenuState<String> menuState = menuTree.getMenuState(aTextMenuItem);

    menuState.getValue();
    menuState.isChanged();
    menuState.isActive();
Updating menu item values
To update a menu item, you don't need to save the state locally, instead just send the command to the server. The server will respond sending the change. To send a delta change (IE add 5 to the items value):
public CorrelationId sendDeltaUpdate(MenuItem item, int deltaChange);
To send an absolute change to the server:
controller.sendAbsoluteUpdate(MenuItem item, Object newValue);
Once the Arduino receives the update, it will apply it to the menu item and publish out the changed value. However you can change the state yourself if you want to (but be aware this will not cause it to update on the remote Arduino device):
menuTree.changeItem(theItem, theItem.newMenuState(value, changedBool, activeBool) );
Sending a dialog button press
To send a dialog button press to the server, use the following method:
controller.sendDialogAction(MenuButtonType buttonType)
The API documentation
This page is intended to just get you started, you can look at the full API documentation and examples that are packaged with the API tests in the source for more details.
These may be of interest
- Similar - Working with menu structures using the CLI
- Similar - Arduino to PC communication using USB serial and Java
- Similar - Embed Control developer version for controlling and monitoring Arduino
- Similar - Control embedded menu application from browser - embedCONTROL.js
- Similar - Getting started with tcMenu Turbo

Want to let us know about something?
- If this is a library documentation page, raise a PR on the documentation site.
- Open a discussion on the Community channels
- Contact us for problems or improvements on the main site.
Table of contents
Supporting us
We maintain several popular embedded projects and work hard to make them even better. If you're looking for commercial services, please do consider us.
Alternatively, you can buy us a coffee to say thanks.
Sharing links
Learn about TcMenu
We build and maintain an embedded menu designer and framework that works on many platforms.
