If like me you use both 8 bit AVR and 32 bit boards, you've probably already noticed that there's no EEPROM support on some 32 bit boards. I think that's quite unfortunate as EEPROM storage is very useful for many applications.
Relying on memory backup like many systems today do, is nowhere near as reliable (a flat battery loses everything). Further, I've even seen discussions where people suggest using an area of program Flash as an EEPROM, I don't personally like it as flash write cycles are generally an order of magnitude lower than EEPROM, but it's now supported via the EEPROM class wrapper.
There's a readily available series of EEPROM IC's from Atmel in the form of the AT24Cx range; which offers various capacities in a 8 pin package over i2c. This library abstracts either AVR or I2C ROMs with a single interface, so you can easily interchange them just changing the implementation.
The EEPROM Types
EepromAbstraction (the EEPROM interface)
All the below classes implement this interface, when you want to work with an EEPROM in a function, always use this. For example to pass the abstraction to a function:
void myFunctionNeedingRom(EepromAbstraction* anyEeprom) {
    // your code here!
}
AvrEeprom
This implementation is based on the AVR EEPROM storage and therefore is only available when the platform is AVR (Uno, Mega etc). It wraps all the eeprom functions, and makes it easy should you later want to port to a 32 bit board. To create an instance of this type of ROM:
AvrEeprom rom;
I2cAt24Eeprom
This is an internal, ground up implementation that follows the i2c EEPROM standard, it is compatible with most devices including the At24Cx range of EEPROMs. To use this you need to set the address for the device, normally 0x50 to 0x57 depending on the address selection pins, and the page size for the device. Below, a table shows page sizes for common devices. We've tested with a wide range of devices from AT24C02 through to AT24C128 with various specs, the library works well with all.
| ROM | PageSize | Memory Bytes |
|---|---|---|
| PAGESIZE_AT24C01 | 8 | 128B |
| PAGESIZE_AT24C02 | 8 | 256B |
| PAGESIZE_AT24C04 | 16 | 512B |
| PAGESIZE_AT24C08 | 16 | 1kB |
| PAGESIZE_AT24C16 | 16 | 2kB |
| PAGESIZE_AT24C32 | 32 | 4kB |
| PAGESIZE_AT24C64 | 32 | 8KB |
| PAGESIZE_AT24C128 | 64 | 16KB |
| PAGESIZE_AT24C256 | 64 | 32KB |
| PAGESIZE_AT24C512 | 128 | 64KB |
Here's the code
// first include the required header file
#include <EepromAbstractionWire.h>

// then create the eeprom abstraction giving address and page size
I2cAt24Eeprom rom(0x50, PAGESIZE_AT24C64);

// during the setup() you must initialise the wire library using Wire.begin()
void setup() {
    Wire.begin();

    // your other tasks.
}
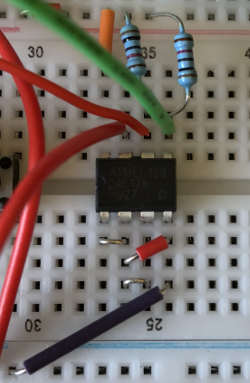
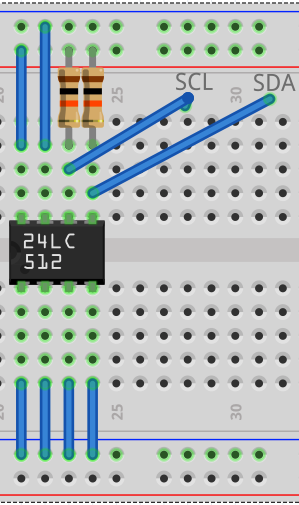
The circuit for an i2c EEPROM (nearly all share same pin-outs):
EEPROMWrapper
This class wraps the EEPROM class available on many Arduino boards for use with this abstraction. Firstly to use the wrapper you must include:
#include <ArduinoEEPROMAbstraction.h>
Note that on the ESP range of devices, you'll need to call EEPROM.begin(size) before using it, and EEPROM.commit() after the writes are complete yourself. Bear in mind what I said earlier, FLASH has far less cycles than regular EEPROM, so save sparingly on 32 bit boards.
ArduinoEEPROMAbstraction eepromWrapper(EEPROM);
EspPreferencesEeprom for ESP32 Preferences storage
Requires ESP32 framework with Preferences library available for use. Note that in order to write back what's in memory you need to call commit to do the actual write.
This class wraps the preferences API that's available on ESP32 Arduino framework. To use the wrapper first include:
#include <esp32/EspPreferencesEeprom.h>
Then construct globally as follows:
EspPreferencesEeprom prefsStore(myNamespace, size);
Where myNamespace is the namespace to use with preferences, and size is the size of the byte array it will create.
Once you've finished writing values to it, flush the values out to storage as follows:
prefsStore.commit();
A word of caution, do not call commit too often, this storage is probably in FLASH, and has limited write cycles.
HalStm32EepromAbstraction for STM32 applications
Requires version 1.8 of IoAbstraction.
For this device to work the HAL functions for STM32F4 or above must be available, and you must define the following compiler flag IOA_ENABLE_STM32_HAL_EXTRAS. Once this is done by default a 512 byte cached EEPROM can be created as follows:
HalStm32EepromAbstraction eeprom;
Then during setup it must be initialised providing the offset into the battery backed RAM, this is very useful if you store multiple things in this memory area. If you want to start at the beginning of battery backed RAM choose 0.
eeprom.initialise(offsetIntoRam);
Should you wish to create a larger area than 512 byte, change EEPROM_WORD_SIZE to the number of 32-bit words to cache: (EG desiredBytes / 4).
NoEeprom
Fulfills the interface but actually does nothing, useful for when EEPROM support is optional. Below is an example of how to create this type:
NoEeprom rom;
MockEepromAbstraction for unit testing
If you tend to unit test your embedded code, you can also mock out the EEPROM. This implementation uses a little RAM instead, defined in EEPROM_MOCK_SIZE and defaults to 128 bytes:
#include <MockEepromAbstraction.h>

MockEepromAbstraction mockEeprom;
It has an additional method useful for error checking, to see if all is good.
mockEeprom.hasErrorOccurred();
Other than this, it behaves identically.
Reading and writing values - all implementations
There are method to read and write both primitive types and arrays, 8 bit, 16 bit and 32 bit values can be written easily with arrays also supported.
To read a byte from ROM at location romStart
byte by = anEeprom.read8(romStart);
To read a 16 bit word from ROM at location romStart
unsigned int i16 = anEeprom.read16(romStart);
To read a 32 bit long from ROM at location romStart
unsigned long i32 = anEeprom.read32(romStart);
To write a byte back to ROM storage at location romStart
anEeprom.write8(romAddr, byteVal);
To write a 16 bit word back to ROM storage at location romStart
anEeprom.write16(romAddr, value16);
To write a 32 bit long back to ROM storage at location romStart
anEeprom.write32(romAddr, value32);
To read an array into memory starting at data from ROM starting at romStart with length len
anEeprom.readIntoMemArray(data, romStart, len); // for uint8_t* data
anEeprom.readCharArrIntoMemArray(data, romStart, len); // for char* data
To write an array from memory starting at data to ROM starting at romStart with length len
anEeprom.writeArrayToRom(romStart, data, len); // for uint8_t* data
anEeprom.writeCharArrToRom(romStart, data, len); // for char* data
A word about EEPROM performance
EEPROM storage is slow, don't read it frequently during program run, it will slow down your code, especially the i2c variant; which probably has a read bandwidth of around 40K/sec. Further, writing is even slower, and there's a limited number of cycles so only write when you need to.
How to save to EEPROM in your project
Firstly, never call save in the menu item callback, if using a rotary encoder that would break your EEPROM in days. Here are some common methods showing how to safely save/write state to EEPROM:
- Capture power loss state and then write out any updated values before the PSU fully discharges. See my article about power detection.
- Provide a save option somewhere that performs the save function.
- Have a task manager event or task that listens for changes and saves a maximum of once every N minutes, where N is as large as you can tolerate. This may still write to EEPROM too frequently.
These may be of interest
- Similar - Write XML with GroovyBuilder
- Similar - Wrapping JFreeChart as a Groovy builder
- Similar - Reading XML in groovy using XmlParser
- Similar - Generate an ATOM feed with GroovyBuilder
- Similar - Groovychart Bar chart with fixed colour

Want to let us know about something?
- If this is a library documentation page, raise a PR on the documentation site.
- Open a discussion on the Community channels
- Contact us for problems or improvements on the main site.
Supporting us
We maintain several popular embedded projects and work hard to make them even better. If you're looking for commercial services, please do consider us.
Alternatively, you can buy us a coffee to say thanks.
Sharing links
Learn about TcMenu
We build and maintain an embedded menu designer and framework that works on many platforms.
