
There are two versions of Embed Control desktop UI, the first is built into TcMenu Designer and is aimed at developers and more advanced users that fully understand the menu tree, and may want to create customize views. Gradually, we're moving toward App Store deployment for most platforms.
TcMenu Designer runs on most desktop systems and can monitor and control embedded devices that are running tcMenu software over Serial or LAN connections. Simply build the remote capability into the menu application running on the device from tcMenu Designer. Embed Control is available from the Windows Store, and soon the MacOS Store, it is closer to the mobile version in how it functions.
It is assumed at this point that you have built a menu application onto a device, and have set up a remote endpoint. Take down the connection details, as you'll need them further down.
TcMenu Designer Developer Desktop
To install the application use the latest release of Embed Control for your desktop here: https://github.com/TcMenu/tcMenu/releases
Once installed start the app, at this point you should see a window similar to below:
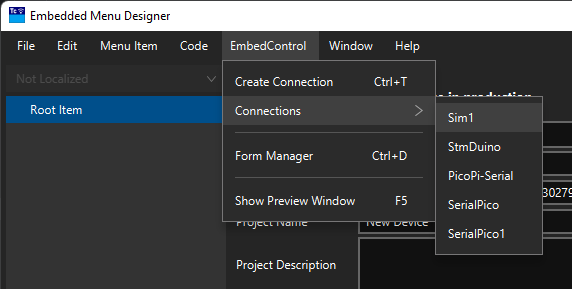
From this menu you can either create a new connection, or connect with an existing connection. If you choose an existing connection from the list of connections, it will open in a new window like the one below.
Creating a connection
To create a new connection select "New connection" from the menu. Once selected the following dialog will appear:
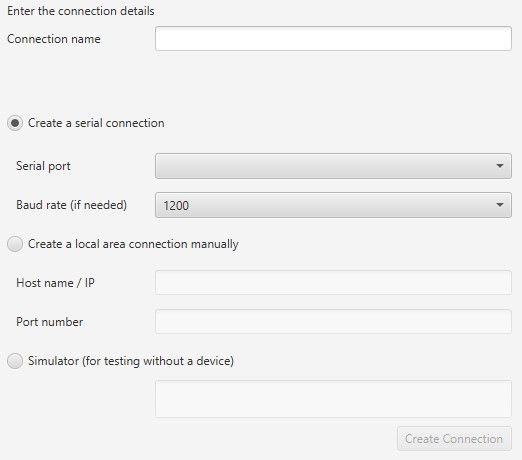
Firstly, it is mandatory to enter a connection name, so enter this first.
Next, choose the type of connection you want to create and fill in the connection details. For a serial connection that is the name of the port and baud. For a socket connection that is the IP address and port number. Just to test the UI you can create a simulator connection.
Once populated, press "Create Connection" and the connection will be created, you'll also now see the new connection in the selection area (3).
Importantly, since 2.3 you must save this connection yourself by pressing the save icon in the right corner of the navigation bar (1). This is to allow temporary connections to be created without overflowing the selection area.
When connected with the device, you'll see the LED in the right corner goes to yellow once fully connected.
Pairing with a connection
When you connect to a board for the first time, it may be the case that you need to pair with the device. This is only the case if you turned on Authentication in tcMenu Designer. When you try to connect the UI automatically detects that pairing is needed and presents the following:

At this point make sure the embedded device is close to hand, as you'll need to accept the request there. Once both devices are close by, click start pairing.
A few moments later, you should see the status change to indicate that pairing is in progress, further, you should see a dialog on the remote device with an "Accept" and "Cancel" option. Ensure the name matches your device and select "Accept".
Once you do this, the pairing status should change to indicate success. You can now close the pairing window.
Note that the pairing attempt will time out after 30 seconds.
Monitoring and managing menu items
If we go back to the original image at the top of the window, we saw a menu structure loaded in the panel area (2). Each menu item had a space in the window, we could see the name of the item and the current value.
Analog items are by default edited using a slider control, while enum and scroll items are edited using up-down buttons. Dates and times use a date time control, while color items use a color wheel. All other items are edited as text.
There is a fair amount of validation before sending an item to the server, it should not be possible to send a bad value.
When you change an item locally, it will not show the new value until the server confirms the value by echoing it back. In that time the item will show in the pending color. Once the update is received the item will change to the updated color momentarily.
Should there be a problem with either sending the update, or you enter a bad value, the control will momentarily go red.
Editing the configuration for a menu
Each menu has its own configuration, and can be edited independently. There are a few global settings, but most settings are stored per menu, allowing a lot of customization right down to the menu item level.
When you click on the settings cog in the navigation bar you'll be presented with this menu:

- Edit colors allows the color and position settings to be managed at various levels (discussed below).
- Edit connection brings up the same connection dialog as the new connection dialog, but in edit mode.
- Delete connection will remove the current connection from both the selection area and from disk. Be careful with this, all customizations will be irretrievably lost.
- Restart connection just stops the current remote connection and restarts it.
Form Editing
These may be of interest
- Similar - Control embedded menu application from browser - embedCONTROL.js
- Similar - Getting started with tcMenu Turbo
- Similar - TcUnicode Font format documentation
- Similar - Text pipelines for drawing with tcUnicode
- Similar - Rendering menus to TFT, LCD and OLED using tcMenu

Want to let us know about something?
- If this is a library documentation page, raise a PR on the documentation site.
- Open a discussion on the Community channels
- Contact us for problems or improvements on the main site.
Table of contents
Supporting us
We maintain several popular embedded projects and work hard to make them even better. If you're looking for commercial services, please do consider us.
Alternatively, you can buy us a coffee to say thanks.
Sharing links
Learn about TcMenu
We build and maintain an embedded menu designer and framework that works on many platforms.
