TcMenu has considerable out of the box remote connectivity on both Arduino and mbed. With support for Ethernet2 library, UipEthernet library, ESP8266 WiFi, ESP32 WiFi and Serial (including Bluetooth Serial) to name a few connectors. Please pay close attention to the following classes in the reference documentation as they are mentioned frequently here:
Please bear in mind that TcMenu is able to support a wide range of remote connectors. However, this guide focuses on the core TcMenuRemoteServer class and also the TagVal API / embedCONTROL protocol. Specific connectivity options are discussed separately in other guides.
Adding remote connections to your project
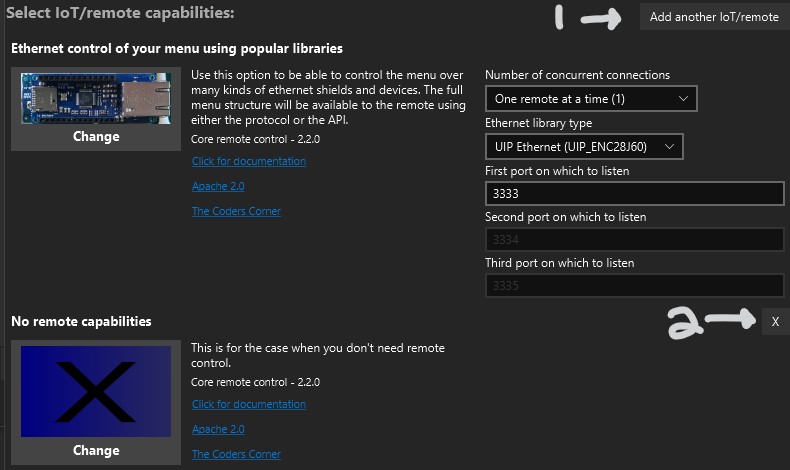
Within the code generator dialog you can add one or more remote connections to your project. In the figure below we show the remote connectivity area where you can add and remove remote / IoT capabilities. You can change the existing remote by selecting the change button on the left, to add another remote in addition to the existing one, press button 1 "Add another IoT". To remove the extra remote capabilities, press button 2 "X".
NOTE: There is always one remote connection, to completely turn off all remote connections you remove all extra remote connections and set the single remaining one to "No Remote".
Managing connections with TcMenuRemoteServer
When any remote connection is added using the above procedure, then a remote server instance of type TcMenuRemoteServer with name remoteServer will be added automatically by the code generator. This class holds on to all the remote connections as instances of BaseRemoteServerConnection, servicing them by calling the tick() method very frequently. There are different types of server connections, but they must all implement this interface.
Each of these remote connections is given a number, with the first one being 0 and so on. TcMenu embedded library can theoretically handle up to 6 such connections at the moment. In most cases, memory and hardware constraints would probably hit much sooner than that.
When you generate a new remote connection within the designer, it will automatically add that connection to the remote server. However, if you create any manually, outside of designer then these need to be manually added.
You can access any of the remote connections by calling the remoteServer.getRemoteServerConnection(int remoteNumber) method, it will return a pointer to a BaseRemoteServerConnection object or nullptr if there is no entry at that remote number.
Authentication Editor and IoT monitor
From version 2.2 onwards, you can add the IoT monitor and Authentication menu items directly from designer without the need to manually declare them. For remote IoT monitor, you must have at least one remote or IoT device, and for the Authentication menu item, you must be using an EEPROM Authenticator. These are the only restrictions.
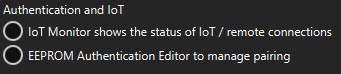
From the main designer screen, select the submenu onto which you wish to add the components in the tree, and then choose to add a new menu item, from the new menu item dialog, choose IoT monitor or Authenticator (see figure above), and the new item will be added.
The remote menu item will take over as comms listener to all active connections, if you also need to listen for communications changes, then you add a communications listener to the remote monitor menu item, here we assume the menu item variable name for the IoT Monitor was menuRemoteMonitor:
void onCommsChange(CommunicationInfo info) {
    // examples of handling comms change here.
    int remoteNum = info.remoteNo;
    bool connected = info.connected;
    uint16_t error = info.errorMode;

    serdebugF4("listener(num, connected, error)", remoteNum, connected, error);
}

menuRemoteMonitor.registerCommsNotification(onCommsChange);
TagVal/embedCONTROL based remote connections
A typical menu application with an embedCONTROL connector will be able to accept connections from any source that can communicate using TagVal protocol. On the Arduino side, each TagVal connector needs a TagValTransport that bridges the gap between the underlying library and the connector, a CombinedMessageProcessor to handle incoming messages, and lastly a TagValueRemoteConnector that actually handles all the connection logic.
Authentication in tcMenu is actually achieved by the client application sending the name and UUID field while joining. No messages other than heartbeats can be processed until the join is successfully completed. During join message processing the provided details are passed to the currently setup authentication manager, that will either allow or deny the connection.
NOTE: It should be noted that TagVal is presently not encrypted and only suitable for use in local area networks. There is a plan to provide optional encryption components soon.
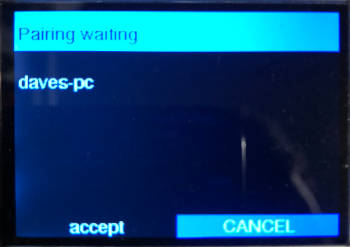
There is a second type of connection called pairing, this is used to add another application (name and UUID pair) to the list of allowed connections. In this mode the Arduino / embedded device immediately shows the following dialog upon receiving a pairing request. Only when the ACCEPT button is pressed will the new application credentials be stored in the authentication manager.
Legacy (before 2.2) - manually add IoT/Authentication item
Before V2.2 only.
We strongly recommend you use the above method whenever possible, but it is also possible to add connectivity menu items your menu manually. There are several available options, including RemoteMenuItem that displays all current connections and EepromAuthenicationInfoMenuItem that displays all current authentication pairs. Both of these items are runtime menu items so can easily be added in code as follows.
Let's assume there is a menu item called menuConnectivity, of type submenu with one child item named menuIpAddress. We will now add two more items to manage the connections and authentication.
// Here we create two additional menus, that will be added manually to handle the connectivity
// status and authentication keys. We link the authentication item to the remote monitor item.
// These are created as globals.
RemoteMenuItem menuRemoteMonitor(1001, 2);
EepromAuthenicationInfoMenuItem menuAuthKeyMgr(1002, &authManager, &menuRemoteMonitor);

// later in setup..

// here we link our new menus with the existing menu (menuIpAddress)
menuIpAddress.setNext(&menuAuthKeyMgr);

// and we add the first connector to the monitor
menuRemoteMonitor.addConnector(remoteServer.getRemoteConnector(0));

// and lastly you really don't want the authenication information going to remotes.
menuAuthKeyMgr.setLocalOnly(true);
These may be of interest
- Similar - Embed Control developer version for controlling and monitoring Arduino
- Similar - Control embedded menu application from browser - embedCONTROL.js
- Similar - Getting started with tcMenu Turbo
- Similar - TcUnicode Font format documentation
- Similar - Text pipelines for drawing with tcUnicode

Want to let us know about something?
- If this is a library documentation page, raise a PR on the documentation site.
- Open a discussion on the Community channels
- Contact us for problems or improvements on the main site.
Table of contents
Supporting us
We maintain several popular embedded projects and work hard to make them even better. If you're looking for commercial services, please do consider us.
Alternatively, you can buy us a coffee to say thanks.
Sharing links
Learn about TcMenu
We build and maintain an embedded menu designer and framework that works on many platforms.
