<img class=" titleimg" alt="Arduino Game Board 20x4" src="/images/electronics/arduino/games/game-library-20x4.jpg"/>
Here we discuss a game library that provides an easy way to write games with 20x4 parallel display and a few micro-switches. There is quite a lot of stuff going on in this library, so I'd like to start slow and build up. First, let's start by taking a look at the parts needed to use this library:
- 20x4 display (other size will work too)
- 4k7 resistors (at least 6)
- 220R or 330R resistor for backlight
- Microswitches for joystick
- 1uF capacitor to smooth PWM
- Arduino and breadboard!
For a simple game we need some baddies, a player (that we can move) and possibly the ability to fire. In addition we need collision detection to work out when a baddie has been caught or the game is over because the player was hit. Options for writing games are limited on a 20x4 display, but we've managed to put a few games together.
Getting the source code
Bear in mind that this game library is currently pre BETA, I'm presently improving the documentation, code and diagrams.
Source for this library and ziip download are available on git hub: https://github.com/davetcc/LcdGameBuilder
Parts of the game library
Our player
In our game library they player is the piece under our control, it is represented by a Player object. The player is moved by using the keys that make up the joystick. The game library provides support for moving the player and detecting collisions with baddies. Our player can also shoot things by pressing fire.
Baddies
Opponents are referred to as baddies in this library. We create an array of baddies and they can either be moved automatically by the game engine, or manually in code. Baddies can be made to move in a direction and also to track the player. When baddies get to the edge of the screen they are marked as being "offBoard".
Fire button support
There are also helper classes that can move a component across the screen when fire is pressed. These components can also determine if a baddie has come into contact with the bullet.
Game Engine
The game engine ties everything together, it can run the game loop, does all the rendering and also contains most of the helper classes to handle collision detection. It is the central point when dealing with the library. Game engine also does keyboard debouncing to make movement more accurate. See De-bouncing input switches for Arduino for more about this.
Building the circuit
For this circuit we need to to combine several components together to make a working game board.
First we need a joystick. For this we will place five buttons for the joystick: left, right, up, down and fire. Each button will be built like the switch below. I'd recommend a layout similar to the one in the image at the top of the article.
For the display we will use a fairly standard wiring arrangement for the 20x4 display with the contrast pin on the display (Vo) will be built using the PWM smoothing circuit below instead of using a potentiometer. We just need a 4K7 resistor and 1uF capacitor to smooth out the PWM into a constant voltage. Follow this link for a more detailed article on setting up the display: Wiring a 20x4 character display to an Arduino board
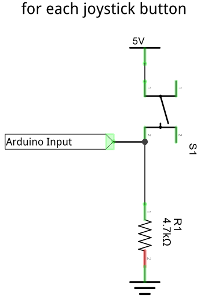
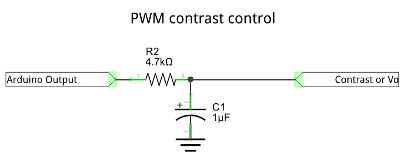
Left: Each joystick button uses this circuit. Right: PWM contrast control.
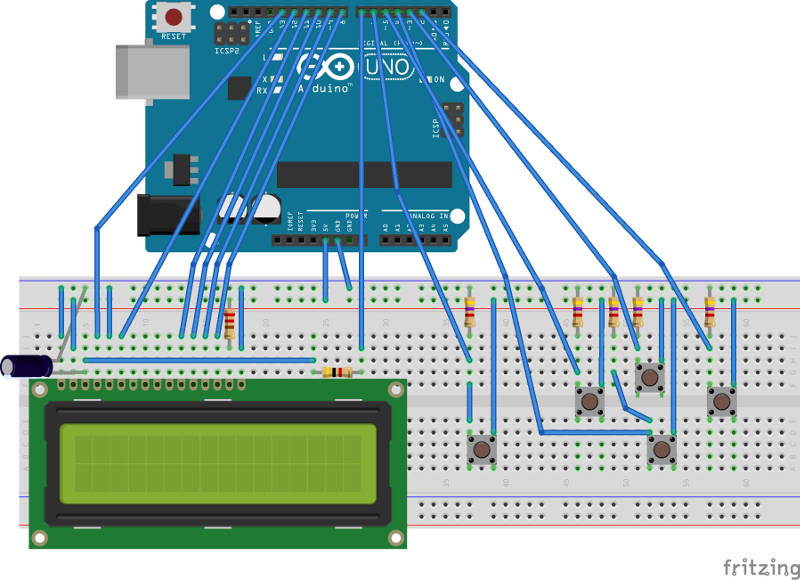
Above: breadboard layout for the circuit. Includes display layout and joystick buttons.
On the next page we discuss installing the library and getting started with the code.
Although the examples are included in the downloadable package on github, we include two of the examples here so that you get an idea of how it works. They are broken down further and discussed. I'd recommend getting a zip archive of the library and installing it into your Arduino libraries directory (normally under Documents/Arduino/libraries). Once installed open the keyboard test example. It will allow you to:
- test that the display circuit is built correctly and that text appears on the display
- test that the joystick is working correctly, as you press buttons, they should show on the screen
- find the optimum setting of contrast. Using the up and down buttons the contrast can be adjusted, the number is displayed and can be used in subsequent examples.
Once keyboard test is working, you can move on to one of the examples and try it out. Here we will look at catch-em, as it is slightly simpler.
Here is a game for the game library broken down into it's component parts
First we include the libraries that we need and set up the board size and number of items on the board other than the player. We also need to initialise the LCD display driver library.
#include <LiquidCrystal.h>
#include <LcdGameBuilder.h>

#define DISPLAY_CONTRAST_PIN 2
#define GAME_DELAY 30
#define ITEMS_TO_CATCH 3
#define BOARDSIZE_X 20
#define BOARDSIZE_Y 4

// we rely on the LiquidCrystal library. It must be initialised first.
LiquidCrystal lcd(52, 53, 46, 47, 48, 49);
Now we tell the LCD library the size of the connected display and we set the contrast pin as output and to the appropriate value, you can change the analog value for the contrast pin to whatever works best for your display. Note that keyboard test lets you adjust the contrast using up and down to try lots of settings.
void setup()
{
	// before anything else we need to initialise the lcd library
	lcd.begin(BOARDSIZE_X, BOARDSIZE_Y);

	// here we set the display contrast using PWM, use the keyboardTest sketch
	// to set up your keyboard and workout the brightness level first.
	pinMode(DISPLAY_CONTRAST_PIN, OUTPUT);
	analogWrite(DISPLAY_CONTRAST_PIN, 90);
}
Now we put out some instructions and initialise the game library. We need to tell the library what pins the joystick use and also the display size. We also need to give the library an array of baddies, the library will move the baddies in the way that we tell it. At this point we also initialise the player.
void loop()
{
	instructions();

	// here's the baddies we'll have to catch
	Baddie baddies[ITEMS_TO_CATCH];

	// now we create a game configuration that tells our game engine
	// which inputs the keys are mapped to
	GameConfig config;
	config.downPin = 25;
	config.upPin = 24;
	config.leftPin = 22;
	config.rightPin = 23;
	config.firePin = 26;
	config.boardSizeX = BOARDSIZE_X;
	config.boardSizeY = BOARDSIZE_Y;

	// we need to create a game engine, this manages the keyboard and
	// all the components on the board.
	GameEngine game(&lcd, config, baddies, ITEMS_TO_CATCH);
	game.initialisePlayer("\_/", 8, 3);

	// wait until someone is ready to play
	game.awaitFire();
and now we are in the main loop, this game is time based, so we just decrement a counter until it reaches 0. Further the game library needs a delay inbetween each loop to play at a reasonable speed.
	// start off with 30 seconds to go and nothing saved from falling
	int itemsSaved = 0;
	int timeLeft = 1000;
	while (timeLeft > 0) {

		// the game runs too fast unless it is appropriately delayed.
		delay(GAME_DELAY);
		timeLeft--;
At this point we run the game loop, it moves the player and 'baddies' to their new positions, it also draws everyting at their new positions. After that we run a collision check to see if we caught anything. We can choose what action to take when this happens.
		// the game loop is where all the things on the board are moved
		// to new positions and the screen is redrawn
		game.gameLoop();

		// check if the player has "caught" any baddies.
		int item = game.playerCollisionCheck();
		if (item != -1) {
			// we have, reset the Baddie to a new position
			baddies[item].reposition("(*)", BADDIE_MOVES_DOWN, randomX(), 0, movementSpeed(timeLeft));
			itemsSaved++;
		}
We also need to check if any baddies have moved off the board, if they have the are out of play and need to be re-positioned. Lastly we show the time left at the bottom of the display.
		// otherwise have any baddies gone off the board because they were
		// not caught.
		for (int i = 0; i < ITEMS_TO_CATCH; i++) {
			if(baddies[i].isOffBoard()) {
				baddies[i].reposition("(*)", BADDIE_MOVES_DOWN, randomX(), 0, movementSpeed(timeLeft));
			}
		}

		// finally render the number of seconds left.
		lcd.setCursor(0, 17);
		lcd.print("  ");
		lcd.setCursor(0, 17);
		lcd.print(timeLeft / GAME_DELAY);
	}
Lastly we have the game over code and a few helper functions, to get a random placement and speed for baddies and to print instructions and game over.
	// we are done, show the game over page and wait for the fire button
	gameOver(itemsSaved);
	game.awaitFire();
}

/* this produces a random position for the next baddie repositioning */
char randomX() {
	return (random() % (BOARDSIZE_X - 3));
}

/* this produces a random speed for the next baddie repositioning */
char movementSpeed(int time) {
	int adjust = 10 - (time / 100);
	return (random() % adjust) + 1;
}

void instructions() {
	lcd.clear();
	lcd.setCursor(0, 0);
	lcd.print("CatchEm! Let nothing");
	lcd.setCursor(0, 1);
	lcd.print("get past your ship..");
	lcd.setCursor(0, 3);
	lcd.print("thecoderscorner.com");
}

void gameOver(int itemsSaved) {
	lcd.clear();
	lcd.setCursor(0, 0);
	lcd.print("Out of time");
	lcd.setCursor(0, 1);
	lcd.print("Items saved");
	lcd.setCursor(15, 1);
	lcd.print(itemsSaved);
	lcd.setCursor(0, 2);
	lcd.print("Fire to try again");
	lcd.setCursor(0, 3);
	lcd.print("thecoderscorner.com");
}
I hope this gives you some insight into how the library works, take a look through the examples, and see if you can write a better game!
On the next page, the main methods needed to use the library are documented.
Game Engine
GameEngine(LiquidCrystal *display, GameConfig &config, Baddie baddies[], char numBaddies)
Creates a new game engine by passing in the LiquidCrystal display, the button configuration and screen size in game configuration, an array of baddies and the number of baddies in the array.
void initialisePlayer(const char* playerText, int xPosition, int yPosition)
Initialise the player to render using the text in playerText, and the position on the board.
void awaitFire()
Waits for the fire button to be pressed, then released.
void gameLoop()
Moves all the components (baddies and player) then draws everything onto the display.
Bullet& getPlayerBullet()
Gets the players bullet, so it can be positioned and told to move.
Explosion& getExplosion()
This is used to draw an explosion at a position on the board momentarily after a collision.
int checkKeyboard() *advanced
Not needed in normal circumstances as the library moves the player. Used to check buttons pressed on the keyboard. It is a bitmask and for example to check for left one would: checkKeyboard() & KEYBOARD_LEFT. Definitions are KEYBOARD_LEFT, KEYBOARD_RIGHT, KEYBOARD_UP, KEYBOARD_DOWN and KEYBOARD_FIRE.
int playerCollisionCheck() and int baddieCollisionCheck()
Check if the player or baddie have collided with anything. For the player, it returns the baddie that has collided. In the case of baddie, it shows which baddie has collided with the bullet.
void playerBulletReposition(char movement, char* bulletText)
This is used to reposition the players bullet - for example when fire is pressed. It is given a movement directive as per baddie repositioning.
Game Configuration:
GameConfig config;
	config.downPin = the pin for down
	config.upPin = the pin for up
	config.leftPin = the pint for left
	config.rightPin = the pint for right
	config.firePin = the fire button
	config.boardSizeX = screen size horizontally
	config.boardSizeY = scren size vertically
Baddies
bool isOffBoard()
Check if the baddie has moved off the board, if it has it will need to be respositioned in the game loop.
void reposition(const char *text, char baddieMovement, char x,char y, char speed)
Move the baddie to a new location, the text is what shape the baddie should be, movement is described below, we also specify the position and speed.
void setOffBoard()
Set the baddie off the board, so it will not move any more or render.
bool canBeShot()
Check if the baddie can be shot.
Positioning possibilities:
// the baddie generally moves to the left
#define BADDIE_MOVES_LEFT      0x01
// the baddie generally moves to the right
#define BADDIE_MOVES_RIGHT     0x02
// the baddie generally moves up
#define BADDIE_MOVES_UP        0x04
// the baddie generally moves down
#define BADDIE_MOVES_DOWN      0x08
// the baddie tracks the player
#define BADDIE_TRACKS_PLAYER   0x10
// the baddie can be shot
#define BADDIE_CAN_BE_SHOT     0x20
// the baddie is controlled in the game loop
#define BADDIE_MOVED_BY_ME     0x40
Explosion
void positionExplosion(BoardComponent *compoennt)
position an explosion of any board component.
Other pages within this category
You'll also find me on:


Also find me here