<img class=" titleimg" alt="complete arduino holder" src="/images/electronics/arduino/holder/board-assembled.jpg"/>
After almost shorting out my Arduino with a piece of wire that was left under the circuit board, I decided it was time to mount it onto a proper support board along with the breadboard I often use with it.
Okay I could go out and buy one, but I had a nice piece of high grade birch plywood in the garage (left over from building a pair of speakers). A little bit of cutting, sanding and varnishing later I ended up with a nice board to mount the arduino on.
Also see my newer case for Arduino
Most importantly, I rounded the corners slightly as I don't want to scratch my hand on a sharp corner when in the middle of an experiment. So I started off sanding with 60 grade paper at the edges, as they had saw marks on them. Once everything was fairly smooth, I used 200 grade wet and dry to get everything really smooth. In between coats I used the finest grade of wet and dry (800 grade I think) to ensure a glass like finish.
Once the board was varnished, I test mounted the Arduino board in place and drilled four 3mm holes into the wood through the pre-drilled holes in the Arduino board. These needed to be widened to about 5mm for the bolts. To secure the board in place I then used plastic spacers held in place with nuts and bolts through the pre-drilled holes.
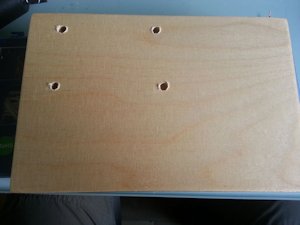
Pre drilled holder, ready for assembly

Closeup of how I mounted the Arduino board to the holder.
Once the bolts were in place I did a test fit to ensure the bottom of the bolts went into the holes in the wood then glued (hot glue gun) the bolts into the holes. As for the breadboard, that had a self adhesive back, so I just carefully placed it as level as possible. It seems to have stuck for now, but I'm cautious of self adhesive pads as they are very variable IMHO.
And there you go, one complete Arduino board holder from a few spare parts!
Other pages within this category
You'll also find me on:


Also find me here