In the theme plugin properties you can often select the font to use. However, there are a few points to bear in mind when using fonts. Here are the key points:
- From version 3.0 Most graphical plugins (other than Uno specific) support TcUnicode, a font rendering system that has full Unicode UTF-8 support. These fonts can be easily created in the designer UI, see further down. It is also backward compatible with Adafruit fonts.
- Each plugin’s text drawing can also use native text drawing, based on how the underlying library itself draws fonts. You must use a compatible font.
- Some libraries such as U8G2 and TFT_eSPI generally include the fonts in the package, and it is up to you to know which ones are available.
- For Adafruit_GFX the fonts are generally included as needed from the
Fontsdirectory, either in the package itself, or from your local project. They will be included once only in the C++ menu file and the variable for the font will be exported. - With themes, the designer will NOT overwrite any theme header file that has already been created in case you have manually modified it, to make the changes you must delete the file yourself so that it is recreated.
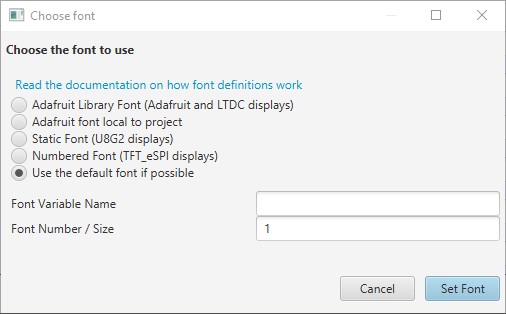
Font definition dialog
We’ll now discuss each option in turn, and what it means in terms of generated code.
Using the default font
Some displays, where there is a concept of default font support it. It’s best not to rely on this and explicitly set a font. For TcUnicode you must specify a font, there is no baked in default.
Adafruit and TcUnicode Library font
For Adafruit_GFX, TcUnicode, and LTDC/BSP libraries Adafruit fonts are used.
For this option you provide a font that will be found in the global Adafruit_GFX Fonts directory, you also provide the magnification factor for this. During code generation we will turn this into a C++ file global include, export the font name for use elsewhere, and set the font definition up.
Adafruit and TcUnicode local font
For Adafruit_GFX, TcUnicode, and LTDC/BSP libraries Adafruit fonts are used.
For this option you provide a font that will be found within your project in a Fonts directory, you also provide the magnification factor for this. During code generation we will turn this into a C++ file project local include, export the font name for use elsewhere, and set the font definition up.
Static Font
In U8G2 the fonts are all included in the library directly, all that is needed is to refer to the variable. This option is suitable when the font is already available and can be referenced by name. It will create a font definition only. For this option provide the name only.
Numbered font
Some displays such as TFT_eSPI keep available fonts in an array, and you refer to them by number. For this option provide the number only. The definition will be created for that font number.
Fonts being passed to rendering functions
Within the core graphics functions, fonts are pased around as a MenuFontDef, this structure has the fontData which is a pointer to the font, and also the fontMag parameter, which is either the size or font number, depending on the device in use.
To construct a font definition manually:
MenuFontDefinition def(fontDataPtr, fontMagOrSize);
It is a struct, so has trivially simple copy characteristics.
Creating a Unicode or Adafruit font using the designer UI
From V3.0 of designer onwards you can create an embedded font from a font available on your desktop. The font creator presently supports header generation for both Adafruit_GFX or TcUnicode fonts. TcUnicode fonts are described in more detail in the next section.
NOTE: It is your responsibility to check the usage license on the font you choose, to ensure you are legally allowed to use it in an embedded context.
To start the font creation utility, it is best to have a project open first, as it will then offer to save within your project.
From the “Code” menu select “Font Creation Utility” (requires 3.0) and the following dialog will be shown:
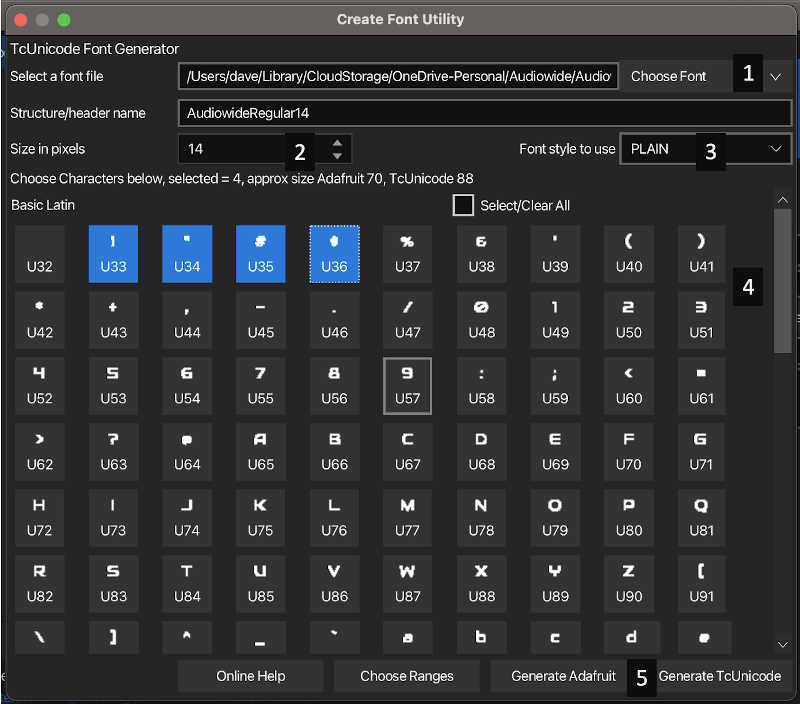
Font Creation Dialog
Notice that the above diagram is annotated with numbers, this is roughly the order that you’d use the panel. Each point is described below:
- Font load button. Click this button to load a font into the creator tool. Once loaded by default it will show the glyphs for Latin in the selection area (4). Clicking on the “Choose Ranges” in the button bar (5) allows you to change the Unicode ranges that are selected.
- Size in pixels of the font to generate, adjust this as needed, as you adjust the font will update in the selection area.
- Font style allows you to change the style, toggling italics and bold typeface, again the selection area automatically updates.
- The selection area is where you can turn on and off both character groups and characters. Toggle the group by clicking the checkbox next to it. To add/remove whole groups use the “Choose Ranges” button.
- The button bar has the two options for code generation, each of these will take a file name and write the font in the format selected. Each of these formats, and their limitations are described below.
Exporting to Adafruit_GFX font format
Exporting to Adafruit font format will write a header file that can be loaded either directly by Adafruit_GFX or by our TcUnicode renderer, meaning you can now use these fonts anywhere.
The underlying format, stores every glyph between a starting point and an ending point, this means that we have to store an empty glyph for every item you want to skip. This is fine if there are not too many points you wish to skip, but if there are many, the size adds up. Also, the absolute maximum char is 0xFFFF.
Exporting to TcUnicode font format
Exporting to TcUnicode font format will write a header file that can be loaded by our TcUnicode renderer, these fonts are supported on most graphical displays that have tcMenu plugins. Meaning full, customizable UTF-8 is available nearly everywhere. Simply enable the support in your code generator plugin.
This format is more customizable than Adafruit fonts, but on the other hand in the simplest case, just LATIN, may take slightly more space. Why? This is because the format is genuinely Unicode, it can support Unicode blocks, and you choose which blocks you want and even can select at the character level. This means that for most unicode cases, it will be much smaller than Adafruit.
Exporting font Summary
Adafruit fonts take very slightly less room for the basic latin case, but quickly get to a similar size when including characters above 127. TcUnicode support is compatible with both, you can take your pick which to use.
Notes for specific implementations
- TFT_eSPI documentation - font section.
- Adafruit_GFX packaged fonts.
- u8g2 fonts page.
- TcUnicode font format documentation
- AdafruitGFX font format documentation
- AdafruitGFX font format helpful guide
Note that when using tcUnicode with themes use the Adafruit/TcUnicode option and set magnification to:
- 0 for TcUnicode based fonts
- 1 for Adafruit based fonts but note that magnification is not implemented.
Designer detects tcUnicode use automaticaly and shows only these options from 3.0 onwards.
Drawing manually with a TcUnicode font
To draw with a TcUnicode font in your code, simply use the global renderer and call getDeviceDrawable() to get a pointer to the device. The below code has the advantage that it can be used with ANY graphical display we support.
auto drawable = renderer.getDeviceDrawable();

// always do this first, it starts transaction with the drawable
drawable->startDraw();

// measure the text we are going to put onscreen the coord value
// has the x and y dimensions. Baseline, the baseline offset.
int baseline = 0;
Coord coord = drawable->textExtents(myFont, 0, "Test", &baseline);

// drawing text, simply set the draw color and then text.
drawable->setDrawColor(RGB(0,0,0));
drawable->drawText(Coord(0,0), myFont, 0, "Test");

// always do this last, it ensures the screen is updated
drawable->endDraw();
As I said above, this code works on every display we have plugins for. It has many other methods for dealing with common drawing operations. Read the full documentation.
You’ll also see examples of using DeviceDrawable within many packaged examples.
Other pages within this category
- TcMenu - Overview and quick start
- Multi language locale based menu for Arduino and mbed
- Embedded Java for Raspberry PI and other embedded Linux
- Setting up IO-expanders in the menu designer
- Integrating EEPROM support into menu applications
- Securing sub-menus and remote connections with an Authenticator
- Taking over the display from a renderer
- MenuManager and menu iteration
- Rendering menus to TFT, LCD and OLED using tcMenu
- Menu control using a matrix keyboard
- TcMenu Designer UI - worked example
- Working with Menu Item types in tcMenu
- Working with menu structures using the CLI
- Creating and using Bitmaps and Title Widgets in your menu
- Code Generator and Plugins guide
You'll also find me on:

