Using TaskManager in your sketches
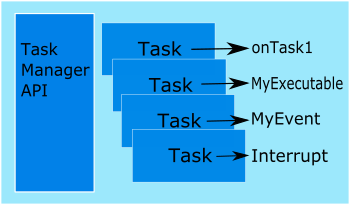
TaskManager is a very simple co-operative coroutines / executor framework that allows work to be scheduled in an internal queue. Instead of writing code using delays, one simply adds jobs to be done at some point in the future. In addition to this, interrupt handling is also supported, such that the interrupt is “marshalled” and handled like a very high priority task to be processed immediately.
When using this library you should never use any method that will delay for more than a few microseconds, failing to follow that guideline will cause problems with interrupt handling and timing.
Getting started with TaskManager
Firstly include it
#include <TaskManagerIO.h>
There is no need to create a task manager, as one is created for you at the global scope called taskManager.
Scheduling things to be done
For every scheduled task that we create, we provide a call back function that will be called at the specified time. These are declared as below. You can also use C11’s shortened lambda syntax if you wish, see the examples in the taskManagement.ino sketch.
void onTimer() {
    // do something here
}
To schedule onTimer to be called once in the future - very similar to setTimeout in javascript:
uint8_t taskId = taskManager.schedule(onceMillis(millisFromNow), onTimer);
In new code prefer the schedule function using one of the following time helper functions:
onceMicros(N)run once in N microsecondsonceMillis(N)run once in N millisecondsonceSeconds(N)run once in N secondsrepeatMicros(N)repeatedly run in N microsecondsrepeatMillis(N)repeatedly run in N millisecondsrepeatSeconds(N)repeatedly run in N seconds
However, you can still use the original schedule functions where the timerUnit will default to milliseconds.
// timerUnit is one of enum TimerUnit TIME_MICROS, TIME_SECONDS, TIME_MILLIS
uint8_t taskId = taskManager.scheduleOnce(millisFromNow, onTimer, timerUnit);
uint8_t taskId = taskManager.scheduleFixedRate(millisInterval, onTimer, timerUnit);
To cancel a Task just pass in the taskId (return value) from a schedule call.
taskManager.cancelTask(uint8_t taskId);
Using C11 lambda functions when scheduling
You can use lambdas that do not capture on any board including AVR.
taskManager.schedule(onceSeconds(20), [] {
    // work to be done
});
From version 1.2 onwards you can enable support to schedule lambda functions that capture arguments on 32 bit boards that support std::function. This includes all ESP boards, all mbed boards, and most SAMD based Arduino devices.
To enable (if support is available on your board), set add the following flag to your compile options: -DTM_ENABLE_CAPTURED_LAMBDAS
int variableToCapture = 42;
taskManager.schedule(onceSeconds(20), [variableToCapture]() {
    // code here can use variableToCapture, some 32 bit boards only.
});
Scheduling things to be done by extending Executable
Should you wish to provide an instance of a class for scheduling then you extend from Executable and implement the exec() method, every time the task runs, the exec method will be called. The optional parameter deleteWhenDone can be set to true to indicate the object was allocated using new and should be deleted when the task completes (or is cancelled).
class MyScheduledClass : public Executable {
    public void exec() override {
        // your task code here
    }
};
MyScheduledClass schedInstance;

taskManager.schedule(onceSeconds(1), &schedInstance);
taskManager.schedule(onceSeconds(1), &schedInstance, [deleteWhenDone=false]);
Scheduling for immediate execution on task manager
taskManager.execute(function, [deleteWhenDone=false]);
taskManager.execute(executable, [deleteWhenDone=false]);
Scheduling a function that has parameters
Should you wish to schedule a function that takes parameters, you can use the ExecWithParameter helper class as follows. Let’s say we wanted to pass the Serial object to the task callback, then we would do as follows:
Firstly, include the required extra header file
#include <ExecWithParameter.h>
Next, create a function that takes the Serial parameter
void myTaskCallback(HardwareSerial *serial) {
    // do something with Serial
}
Lastly, we create the task
// note that the deleteWhenDone parameter is set to true
// if you allocate using new like this, you must set that parameter.
auto task = new ExecWithParameter<HardwareSerial*>(myTaskCallback, &Serial);
taskManager.schedule(onceSeconds(2), task, TIME_MILLIS, true);
There’s also ExecWith2Parameters that allows for two parameters instead of one.
Scheduling tasks more than an hour in duration
Tasks can be scheduled that are hours or even days away. They are created slightly differently to other tasks in that they are first defined, and then registered with task manager.
Step 1 - first we create a schedule either globally or using the new operator. The first parameter is the schedule on which it should be called, the second parameter is either a timer function as described above, or an executable as described above. Optionally, the third parameter is a boolean indicating if the schedule should run only once (true), or until cancelled (false).
For example here we create an hour and a half schedule and a daily schedule:
TmLongSchedule hourAndHalfSchedule(makeHourSchedule(1, 30), &myExecutableReference);
TmLongSchedule onceADaySchedule(makeDaySchedule(1), myCallbackFunction);
TmLongSchedule runOnlyOnceSchedule(makeHourSchedule(0, 30), myCallbackFunction, true);
Step 2: we register the long schedule
taskManager.registerEvent(&hourAndHalfSchedule);
taskManager.registerEvent(&onceADaySchedule);
Enable or disable tasks
Tasks start out enabled, and can be disabled and re-enabled afterwards at will. When a task is disabled it will no longer execute or be scheduled. However, there is the remote possibility that a request to disable may be too late to prevent execution.
taskManager.setTaskEnabled(taskId, isEnabled);
Where:
- taskId is the ID of a task returned from a schedule function.
- isEnabled is true to enable, otherwise false.
Complete example of scheduling with Executable
A more complete example that can be copied into an Arduino IDE, that stores integers in a class that extends from Executable:
#include <TaskManagerIO.h>

// create a class that extends executable and stores an integer.
class IntegerExec : public Executable {
private:
  int intValue;
public:
  IntegerExec(int val) {
      intValue = val;
  }

  // its exec is called at the schedule interval
  void exec() override {
      Serial.print("Int value is ");
      Serial.println(intValue);
  }

  void increment() {
    intValue++;
  }
};

// we now create a couple of globals to be called back.
IntegerExec firstExec(42);
IntegerExec anotherExec(1001);
IntegerExec yetAnotherExec(10000);

void setup() {
  // start up the serial port.
  Serial.begin(115200);

  // now register three executable tasks.
  taskManager.scheduleOnce(1000, &firstExec);
  taskManager.scheduleOnce(2000, &anotherExec);
  taskManager.scheduleFixedRate(500, &yetAnotherExec);

  // and one regular function based task.
  taskManager.scheduleFixedRate(250, [] {
    yetAnotherExec.increment();
  });
}

void loop() {
  // we must always call runLoop on taskManager within loop
  taskManager.runLoop();
}
Example output snippet in the Serial Monitor from the above sketch:
Int value is 10001
Int value is 42
Int value is 10003
Int value is 10005
Int value is 1001
Int value is 10007
Int value is 10009
Handling short pauses in execution
If in your own code you need to wait for a few microseconds for hardware states to settle, you can use this method which actually lets other tasks continue until the number of microseconds has passed:
void yieldForMicros(micros);
Setting up loop()
In the Arduino loop method, just put one call to the task manager. You must not do anything here that sleeps or goes into long loops, otherwise the taskManager won’t schedule things on time.
void loop() {
	taskManager.runLoop();
}
Debugging what tasks are in use
Debugging what slots are used and free is possible as below, where I dump all the tasks to the serial port, the output is the state of each task in turn.
| State | Meaning |
|---|---|
| R | Repeating task |
| U | In use |
| F | Free |
| r | Repeated running |
| u | In use running |
char debugData[10]; // this must be at least as big as the number of slots
Serial.println(checkAvailableSlots(debugData, sizeof debugData));
There’s rarely a need to change the number of tasks, task manager grows the number of tasks automatically in a way that will suit 99% of cases. However, in extreme cases, you can define DEFAULT_TASK_SIZE that sets the initial number of task slots, and DEFAULT_TASK_BLOCKS that sets the number of times it will create an additional block of the same size.
Other pages within this category
- Task Manager Low Power example for SAMD boards
- Programming Arduino using tasks instead of loops - tutorial
- Task Manager - Spin Lock guide
- All library - Cross platform build support
- Marshalling interrupts into TaskManagerIO tasks
- Creating interrupt and threaded events with TaskManager
- How to create a polled event with TaskManager
- Scheduling tasks with Task Manager on Arduino and mbed
You'll also find me on:

