If you're anything like me, you'll probably want to develop any large Java application using a fully fledged IDE such as IntelliJ or Eclipse. However, these are probably better run on another computer if available, transferring the code onto the PI. This article shows how to use maven to do fast turn around development onto a PI from a laptop. Note I'm not talking about using this for single class file Java development, but for larger systems.
Oracle really have fulfilled the goal of Java everywhere, even embedded devices like the Raspberry PI run Java favourably. Further, if you install the standard Raspbian image then you now get java by default. What may not be quite so easy is to run a fully-fledged Java IDE on the PI, which is fine for small Java tasks, but for larger tasks, one may want to have the comfort of an IDE.
What I recommend for writing more than a basic program, is to develop on a regular laptop and push the code down to the PI. There are many ways to achieve this, but here I'll show how I do it using maven and a network share. From this point on, I'll assume you've got a rasberry PI with a recent Raspian image running on it, and that you've got the ssh daemon running. If you're not familiar with maven, it may be worth checking out the comprehensive online maven documentation.
Having a common network point between windows and the PI.
For this procedure to work, we need a common network point between the two computers. If you have a NAS use that, otherwise share a folder on your laptop/desktop. At this point get the windows share name for the share as we will need it to proceed. In this tutorial I use IntelliJ but you could use eclipse with only minor differences. Firstly, we are going to create a new maven project on the laptop/desktop. In IDEA I just select maven as the module type in the New Module Wizard.
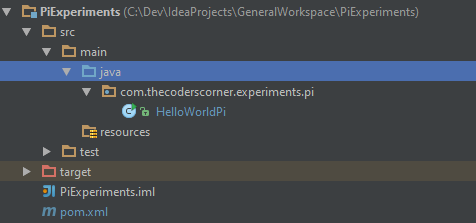
Above, is approximately what we should end up, regardless of IDE choice. It is a simple maven project that can build Java source. At this point we need to add an instruction to tell maven where our shiny new share is, as this is where deployments will go. Open the pom.xml file and add the distribution management section as below:
<?xml version="1.0" encoding="UTF-8"?>
<project xmlns="http://maven.apache.org/POM/4.0.0"
         xmlns:xsi="http://www.w3.org/2001/XMLSchema-instance"
         xsi:schemaLocation="http://maven.apache.org/POM/4.0.0 http://maven.apache.org/xsd/maven-4.0.0.xsd">
    <modelVersion>4.0.0</modelVersion>

    <distributionManagement>
        <repository>
            <id>shared-repo</id>
            <url>file://///MyServer/mySharedRepo</url>
        </repository>
    </distributionManagement>

    <groupId>com.thecoderscorner</groupId>
    <artifactId>PiExperiments</artifactId>
    <version>0.1-SNAPSHOT</version>

    <!-- rest of project file -->
Now we will write a simple java class:
package com.thecoderscorner.experiments.pi;

/**
 * This is a really simple hello world program to get java working on the PI
 */
public class HelloWorldPi {
    public static void main(String[] args) {
        System.out.println("Hello Raspberry PI!");
    }
}
At this point we have everything we need to perform a deployment. So now let's get everything built. Within IDEA there is a maven tool window that allows us to execute maven goals, to open it press Alt-F1 from the maven pom file (pom.xml) editor window. You should see a tool window like the following:
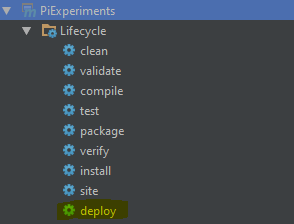
If you've followed my naming, you'll have a "PiExperiments/Lifecycle" item, choose the deploy from underneath this item. This will compile the code and deploy the jar file onto the above configured network share. At this point we are ready to swap over to the PI.
Getting the code to run on the PI
Open an ssh session with the PI. Now we'll need to mount the share onto the PI, there's a couple of good sites that explain how to do this: Windows shares on the Raspberry PI
Assuming you've mounted the share, now we locate the java program that we built earlier quite easily. Change into the share that you've just mounted and now you'll see a directory structure that looks exactly like the package structure. If you've followed my example it would be "[share_home_dir]/com/thecoderscorner/PiExperiments/0.1-SNAPSHOT".
Anything ending with SNAPSHOT in maven usually means an ongoing build, where the most recent build will overwrite the previous one. We can keep building snapshot versions until we are happy with the functionality. See the release plugin for maven. Within this directory is a jar file, that contains the built code. We can run this as follows:
pi@raspberrypi /mnt/sourceDocs/sharedRepo/com/thecoderscorner/PiExperiments/0.1-SNAPSHOT $ pwd
/mnt/sourceDocs/sharedRepo/com/thecoderscorner/PiExperiments/0.1-SNAPSHOT
pi@raspberrypi /mnt/sourceDocs/sharedRepo/com/thecoderscorner/PiExperiments/0.1-SNAPSHOT $ java -classpath PiExperiments-0.1-20151011.073706-1.jar com.thecoderscorner.experiments.pi.HelloWorldPi
Hello Raspberry PI!
You are all set!
Now you can change to code and deploy at will. Every time you deploy, the new code will be immediately available on the PI. In most cases you can test on Windows first, unless you're using native stuff such as PI4J of course..
Of note, if the code is hosted on a windows share, you'll probably need to stop the process on the PI before starting another build to avoid file locking.
Other pages within this category
You'll also find me on:


Also find me here