
Unit testing embedded and Arduino projects
When you’ve got more than the simplest embedded program for Arduino (or any other framework), it becomes much harder to test that it’s working properly by purely running it. For something like Blink, testing is simple because all we need to do is upload it and see the LED turn on and off; there’s little risk of missing anything significant. However, let’s skip forward to a menu based application with Serial or Ethernet control, there is very little chance that you’d catch all the edge cases by manual testing.
Stabilising an existing Arduino or embedded product
Sometimes the situation arises where a product is built (or gets close to being built), before any concerns about it’s stability are discussed or proper planning arranged. Often this leads to code being written without any proper test plan in place. Combined with very tight deadlines there’s often even no plan to go back and fix things up. Once this situation occurs, it’s probable that the product release will be compromised.

Getting started Unit testing with Arduino platform
This article discusses how to unit test a simple project with Arduino, if you’re not used to writing unit tests, or need more background, then first read this guide on unit testing embedded projects. Presently, all our testing using a custom test framework that is built into IoAbstraction, it can be considered as the least number of components that implement a test framework. It works pretty well overall, we wrote this because we needed the testing to work on all Arduino boards, and even mbed boards too.

Heltek Wifi kit 8 pin outs marked wrongly on some silk screens
I recently bought a Heltek Wifi kit 8 and noticed that although the board itself seems to be a good board the pin-outs, both online and on the silk screen of the board are wrongly specified. For example the silk screen shows SDA and SCL on non standard pins, but this is not the case as far as I can tell. To get this information, I’ve followed the schematic then proven these findings with in circuit testing to prove it.
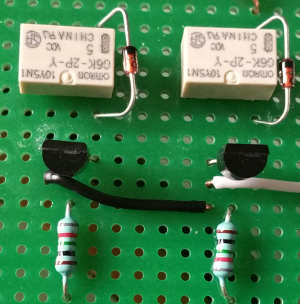
Detecting power loss in a power supply
There are times when your program needs to react to your device being turned off, for example to save the current state of an Arduino sketch to EEPROM before shutting down, or to disengage relays in a power module to ensure there is a clean shutdown. Usually, the power loss detector is designed as part of the power supply, so here I’ve put together an example power supply that we can study, note that this is not intended as an exemplar of power supply design, and is rather incomplete, but to serve as a crude model that we can study to see how to detect power loss.
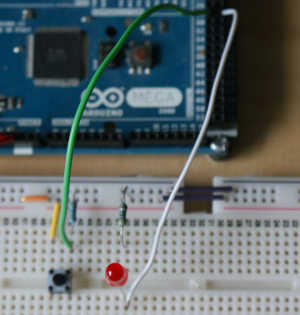
Arduino digital input and output tutorial
In this tutorial and accompanying youtube video (left), I discuss how Arduino inputs and outputs work. Arduino 8 bit boards are mainly based on Atmel AVR chips, in fact the Mega is named after the chip number AVR-Mega-2560. Outputs on the AVR chips are much more versatile than they first look, and the video covers this in detail. If you are using an Arduino pro or other 3V3 based Arduino, replace the 5V mentioned here with 3V3.

IO abstraction: the same code for pins, shift registers and i2c IO
When writing Arduino code that needs quite a few IO pins, you may need to expand the IO using a shift register or i2c expansion device such as the PCF8574. Up until now that meant significantly changing your code to use the new device. If you were using the io-abstraction library then you’d just set up a different type of IO. This library allows you to treat shift registers and i2c exapnders almost as if they were pins.

Designing a simple PGA2310 based preamplifier with network control
At the moment I am prototyping a high quality pre-amplifier based around the PGA2310 volume control and an op-amp buffer input with RF filtering. Each channel will be selectable by relay, along with gain adjustment for each channel in terms of increase in dB. Each channel will be assigned a name that can be changed easily in software and stored along with default volume and channel in the on-board EEPROM.
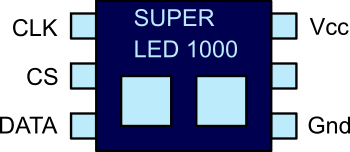
SPI Serial Peripheral interface for Arduino tutorial
In this tutorial, I present a fictional SPI chip that we will use for the sake of example. This chip has two LED’s and controls them over SPI. It will help us to understand SPI with a real worked example. Following on we will build a real world circuit, using the SPI library, to see how easy it is to use SPI on Arduino. Serial Peripheral Interface (SPI) Introduction Serial communication allows less pins to be used to communicate information between two chips or boards, and also removes a whole class of timing issues that are associated with parallel communication.
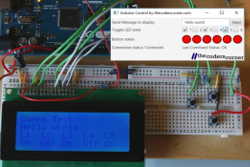
Arduino to PC communication using USB serial and Java
In this article, I present an example showing how to connect an Arduino device to your PC using USB serial and Java. USB serial is available on nearly all Arduino based boards. Further, there are serial interface Java libraries that can connect to an Arduino. If you are unfamiliar with data communications in general, take a look a the introduction to data communications article; although it does not cover serial communication, it is still a good starting point for the unfamiliar.

